Using overworld events
Table of contents
Make sure to read Designing a map first, because this guide will help you understand all of the events that Kristal has.
The Basics
In this tutorial, you'll understand everything about the events in Kristal, how to configure them from Tiled and a few examples on how to use them.
This tutorial is a bit more complex. So there are some things that you need to understand first.
Tiled properties
When you want to create a new event, you can modify how it behaves using the properties of the event.
When adding a custom property to an object, you have to make sure that the type you use in Tiled is the same as the type defined in the code.
This table defines the conversion between Kristal and Tiled types:
| Kristal (lua) | Tiled |
|---|---|
| number | int | float |
| boolean | bool |
| string | string |
| array [] | |
| any | int | bool | string |
As you can see, an array can't be directly defined on Tiled, but we can use another system to define these fields. Link to the tutorial
The any type means that you can use either int, bool or string as the Tiled type of this property.
A number is usually an int (an Integer, a number without any decimals). But sometimes it can be a float (a number with decimals).
In this tutorial, the properties of the events uses this definition: name: type = default.
name is the name of the custom property.
type is the lua type of that property.
default is the value that the property will have if you don't define it in Tiled.
If a property doesn't have this parameter, it means that the property doesn't have a default value.
Map layer colors
As seen in the Map layers page, Kristal defines a few layers, and in this wiki page, you'll use most of them with tutorials and captures. For this reason, I first need to explain what colors I'm giving to each layer, so you can understand what I'm doing in Tiled.
You must understand that these colors are the ones that I like, you can use the colors that you want for your layers. But make them consistent across your whole project. These are the color I'll use in my examples.
| Layer | Color |
|---|---|
objects | Pink. #ff00ff (255, 0, 255)  |
controllers | Golden. #ffc800 (255, 200, 0)  |
markers | Purple. #7f00ff (127, 0, 255)  |
collision | Blue. #0000ff (0, 0, 255)  |
enemycollision | Aqua. #00ffff (0, 255, 255)  |
blockcollision | Aqua. #00ffff (0, 255, 255) |
paths | Green. #00ff00 (0, 255, 0) |
battleareas | Red. #ff0000 (255, 0, 0) |
battleborder | None, because it's a Tile layer |
battleareas and battleborder are explained in the Battle Areas Page.
Text tutorial
The text properties that some events have, are normally defined as string[], an array of strings, since you can't directly create arrays in Tiled, you have to use a custom definition that Kristal implements.
With this system, you can create a single textbox to display text, create multiple textboxes to display more text, or make it so the text changes every time the player interacts with it.
Use the writing text tutorial to know what value to give to these fields.
The syntax of these properties are different depending on the use that you want.
One textbox
If you only want to display a bit of text that fits in one textbox, you can create a custom property called
text: string and give it the text you want.
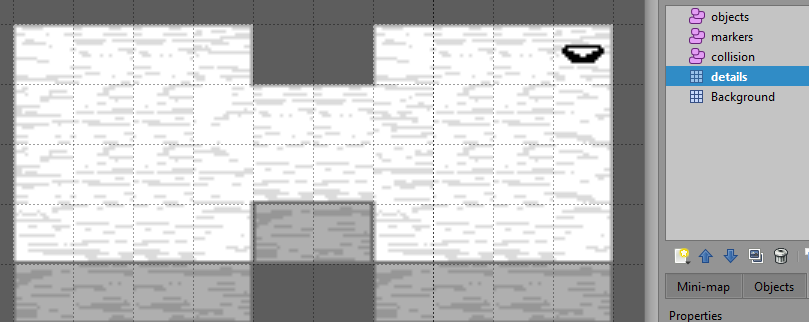
For this example, let's add a hole to the map and add a bit of flavor text that says "* This is just a hole."
First, create a new Tile layer to add detail to the base map and add a hole where you want.
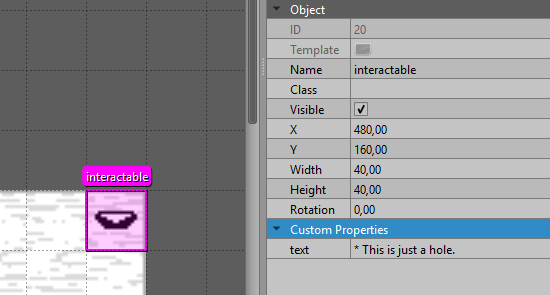
Now... let's add the flavor text, for the example, let's create an Interactable and add the
custom property text with the value: * This is just a hole.
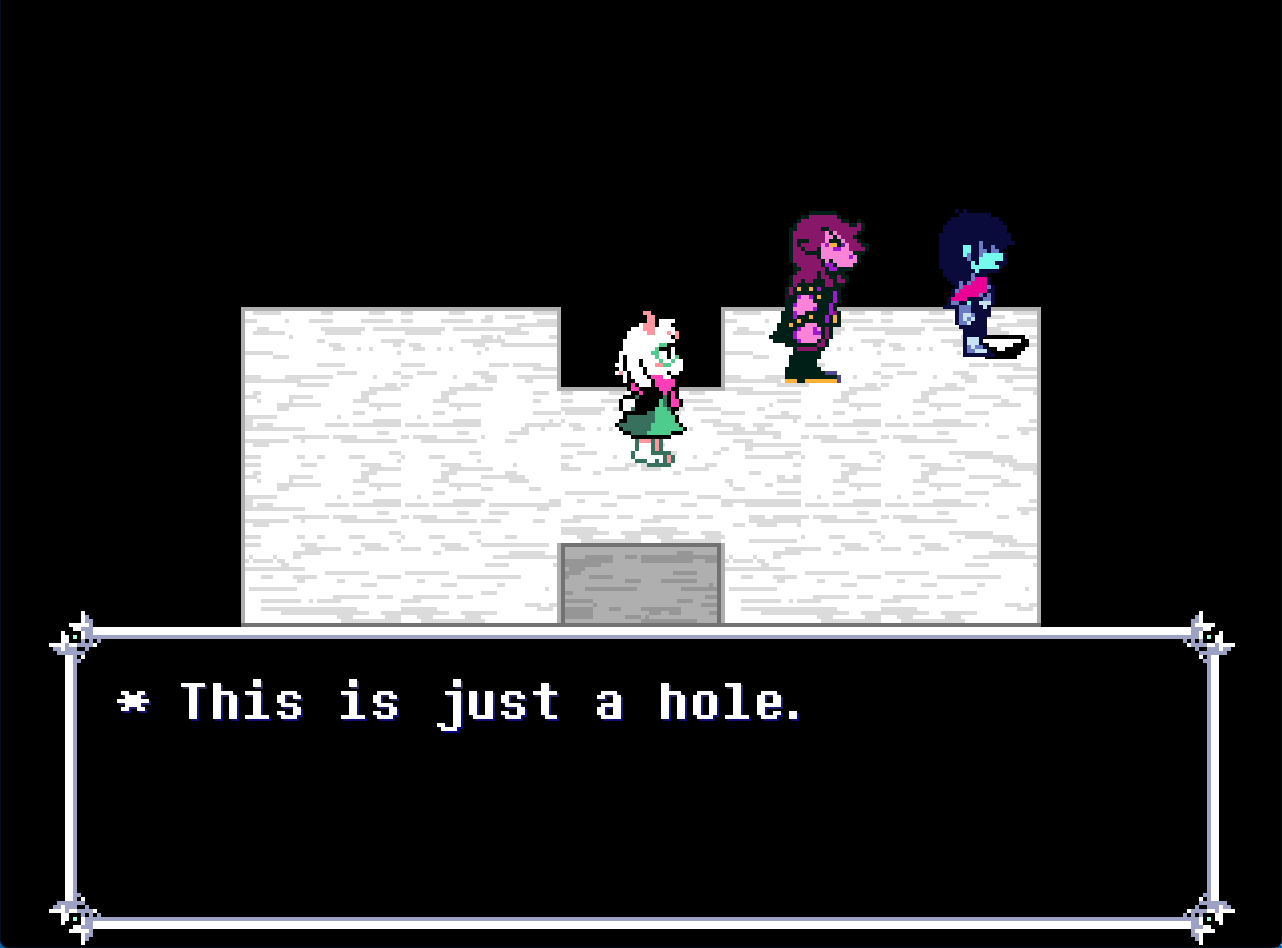
This is what should happen when you interact with the hole.
Multiple textboxes
If the text you want to display doesn't fit in one textbox, you can just use multiple textboxes to display all the text that you want.
Making these uses multiple custom properties, one for each textbox, follow this syntax: textX. X is the number of the textbox.
For example, we want to create an Interactable that says this text.
- Textbox1: * It seems like this is just a hole.
- Textbox2: * But looking closer, it's a hole filled with salsa.
- Textbox3: * You decided that you don't want to step in this hole.
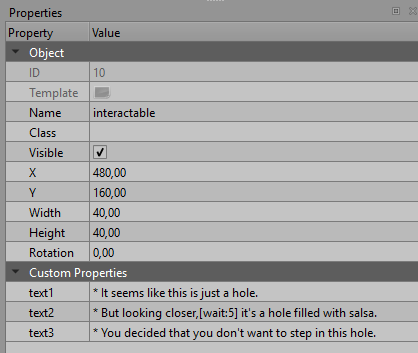
To create this interaction. We have to create an interactable object and give it these properties:
text1: * It seems like this is just a hole.text2: * But looking closer,[wait:5] it's a hole filled with salsa.text3: * You decided that you don't want to step in this hole.
Different text in multiples interactions
If you want to display a different text depending on the times you've interacted with an object, you can do that easily using this syntax: textX_Y. X is the number of the interaction and Y is the number of the textbox in that interaction.
For example, we'll modify the previously created Interactable to add more interactions.
Interaction 1
- Textbox1: * It seems like this is just a hole.
- Textbox2: * But looking closer, it's a hole filled with salsa.
- Textbox3: * You decided that you don't want to step in this hole.
Interaction 2
- Textbox1: * You check the hole again.
- Textbox2: * It's still filled with salsa.
Interaction 3
- Textbox1: * You check the hole again.
- Textbox2: * It seems like the salsa is gone.
- Textbox3: * Sorry Kris, but you were too slow. (Susie dialog)
Interaction 4
- Textbox1: * Just a hole.
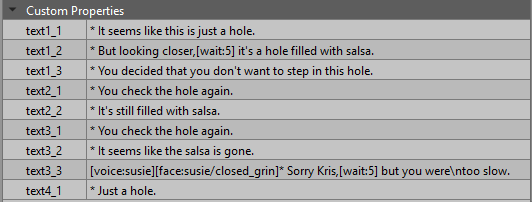
To create this interaction, delete the old properties and add these new ones:
text1_1: * It seems like this is just a hole.text1_2: * But looking closer,[wait:5] it's a hole filled with salsa.text1_3: * You decided that you don't want to step in this hole.text2_1: * You check the hole again.text2_2: * It's still filled with salsa.text3_1: * You check the hole again.text3_2: * It seems like the salsa is gone.text3_3: [voice:susie][face:susie/closed_grin]* Sorry Kris,[wait:5] but you were\n too slow.text4_1: * Just a hole.
Making scripts
Scripts are a function that you can execute on some events. Like a cutscene, but with different parameters and without having to use the cutscene system.
To make a script, create a "file".lua in /scripts/world/scripts. file is the name of the script, and the
name you'll use to call that script.
For this example, let's create a test_script.lua and store it in that directory. Then we'll need to create the code that will be executed.
You can use this as a placeholder for your own scripts.
---The function that will be executed
---@param event Event The event that executes this script
---@param player Player The player that executes this script
---@param facing string The direction the player is facing. Only set if the script is executed in a interactable or NPC event
return function(event, player, facing)
    -- Code to be executed
end
As you can see, the function has multiple parameters, but these parameters vary depending on the event that calls this script.
If you use a Interactable or a NPC, the function will receive event, player and facing. facing will be
set to "left", "up", "down" or "right".
If you use a Script, the function will receive event and player.
If you use a Tile Button, only event will be set.
Let's create something silly for this example, like making Kris t-pose and play a funny sound.
---The function that will be executed
---@param event Event The event that executes this script
---@param player Player The player that executes this script
---@param facing string The direction the player is facing. Only set if the script is executed in a interactable event. Can be "up", "down", "left" or "right"
return function(event, player, facing)
    --Changes the player sprite (Kris in this example) to the t_pose sprite
    player:setSprite("t_pose")
    --Play the Lancer splat sound
    Assets.playSound("splat")
end
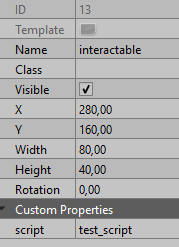
You can execute this if you create an Interactable and add a custom field called script with the value: test_script
or create an Script and give it the same property.
Path system tutorial
Paths are a way of defining how some objects move in the overworld, essentially, they are a list of points that the object moves in between.
To create a path, make a new object layer that starts with the name paths. Then use the insert polygon tool (P) utility from Tiled
and create a polygon, the perimeter of the polygon is the path that the object will follow, don't forget to add a name to the polygon
because that is how you will reference it later.
If you want to make a circular path, use the Insert Ellipse (C) tool and create the circular shape that you want your path to be.
The path is the circumference of your ellipse. Don't forget to name it because that is how you'll reference this path.
This type of paths can't be used in cutcenes.
That's all for the creations of paths, now let's go over some examples on how to use this system.
Examples
Using paths on an NPC
First, head over the NPCs tutorial to make an NPC. Then we're going to make it actually move.
Now that you have your NPC, let's make a path for it to move.
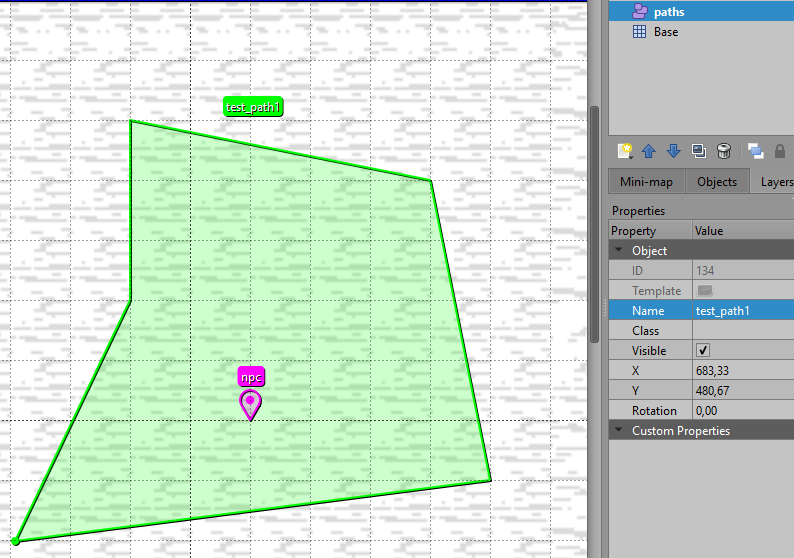
Use the insert polygon tool (P) to create a polygon that defines the path the NPC will move through, then name your path.
I'll name mine test_path1. You should close this polygon since the npc will loop through it.
If we look through the custom properties that an NPC has over a path, we see these:
path: string-> The name of the path shape that the NPC will follow.speed: number = 6-> The speed that the NPC will move along the path specified inpath, if defined.progress: number = 0-> The initial progress of the NPC along theirpath, if defined, as a decimal value between 0 and 1. 0 being the start of the path and 1 the end of the path.
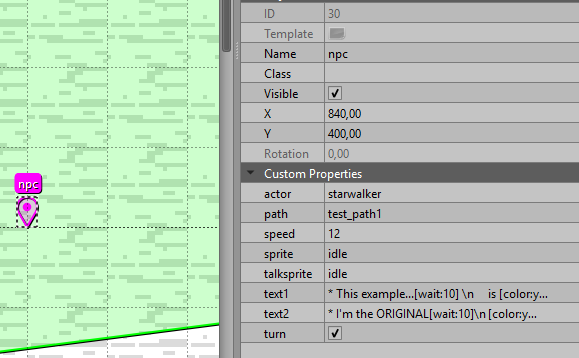
So... let's add these to our npc. Since the name of the path I created is test_path1 this is how I ended up configuring my npc.
And this is how it looks in game!
Using paths on a Chaser Enemy
There is a tutorial of this in the Chaser enemy tutorial.
Using paths in cutscenes
You can't use an ellipse as a path in a cutscene. Only a polygon.
Paths are used in WorldCutscenes to make characters walk or slide along a defined path.
You can use your paths in a cutscene using these functions:
The main difference between walkPath and slidePath is that walkPath makes a character do its walking animation,
while slidePath just moves an object.
Pretty simple right? Well... not so much when you consider how many options these functions have. Since the options are already defined in the API, I'll just use them in the examples.
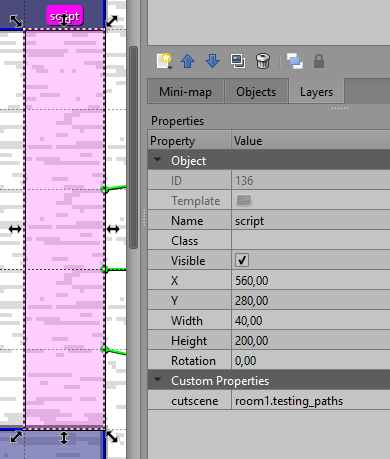
First, I'll create a new cutscene in my room1 group and name it testing_paths.
In the file scripts/world/cutcenes/room1.lua
---@param cutscene WorldCutscene The cutcene object
---@param event Event The event that executes this cutcene
testing_paths = function (cutscene, event)
end
We have our placeholder cutcene, now... let's create the paths that the characters will use. I don't want my paths to loop, so I won't close the polygons.
This is what I've created.
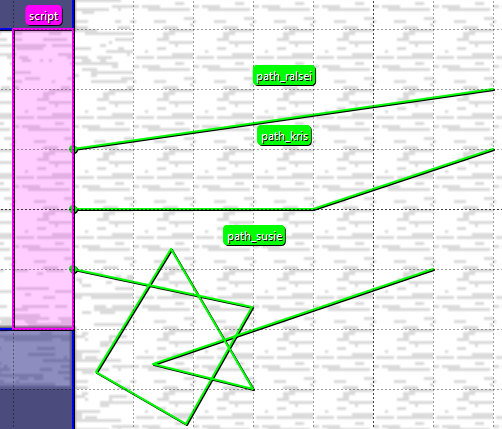
As you can see, I've created some pretty odd looking paths, just for fun, I've also created an script event to execute the cutcene, this is the custom property I've given it.
Now we can actually write the cutcene that uses these paths. This is what I ended up making.
--- A testing cutcene to see how paths in cutscenes work
---@param cutscene WorldCutscene The cutcene object
---@param event TileButton The event that executes this cutcene
testing_paths = function (cutscene, event)

    -- Get the fun gang, since we're going to move them
    local kris = cutscene:getCharacter("kris")
    local susie = cutscene:getCharacter("susie")
    local ralsei = cutscene:getCharacter("ralsei")

    -- nil checking is always useful
    if kris and susie and ralsei then

        -- Since we're moving susie and ralsei, we've to make them stop following kris
        cutscene:detachFollowers()

        -- See the options in walkPath to understand this table
        local options = {
            facing = "right",
            speed = 4,
            snap = false
        }
        cutscene:walkPath(kris, "path_kris", options)
        cutscene:walkPath(ralsei, "path_ralsei", options)

        -- See the options in slidePath to understand this table
        options = {
            facing = "right",
            time = 2,
            ease = "in-out-sine",
            snap = false
        }
        cutscene:slidePath(susie, "path_susie", options)

        -- Wait for them to complete the path
        -- If we use time for everyone, we can know exactly how long they'll take
        cutscene:wait(5)

        -- Just some text for fun
        cutscene:text("* What was that?", "concern_smile", ralsei)
        cutscene:text("* I don't know,[wait:5] I just wanted to do something fun.", "small_smile", susie)
        cutscene:text("* And...[wait:5] was it fun?", "concern_smile", ralsei)
        cutscene:text("* Not really...[wait:5] just nauseating.", "nervous_side", susie)
        cutscene:text("* .[wait:5].[wait:5].[wait:5]", "neutral", susie)
        cutscene:text("* .[wait:5].[wait:5].[wait:5]", "neutral_side", susie)
        cutscene:text("* Lets just go already.", "nervous_side", susie)

        -- Attack the followers back to kris
        cutscene:attachFollowers()

        cutscene:wait(1)

    end
end
And this is how the cutcene looks in game.
Interactable
An interactable is an object that activates scripts, cutscenes or text when the player interacts with it, when the player presses the action button (normally the "Z" key).
This Event should be an area, so create it using a rectangle and name it interactable
on an objects layer.
This is what you can use to add flavor text to an overworld object.
These are the properties of the event:
solid: boolean = false-> If true, the player will collide with this object as if it was a collider.
If false, the player will go through the object.cutscene: string-> The name of a cutscene to start when interacting with this object. Remember to name it group.name.script: string-> The name of a script file to execute when interacting with this object.text: string[]-> The text that will be displayed on a textbox when the player interacts. Tutorial to this property.setflag: string-> The name of the flag that will be set tosetvaluewhen the player interacts. You can definesetvalueif you use this property.setvalue: any = true-> The value to set the flag specified byset_flagto.once: boolean = false-> If true, this event can only be interacted with once per save file.
If false, you can interact with this event as many times as you want.
cutscene, script and text are mutually exclusive, so only one of them should be used in an Interactable.
Examples
Using an script
Follow the script creation tutorial and add the test_script to the script custom property.
Using a cutscene
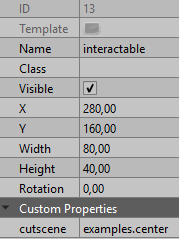
It's the same process as using an script, we can even use the same test cutscenes as in the
cutscenes tutorial. Just add a cutscene property and give it the value: examples.center
Flavor text
Follow the text tutorial because it creates an Interactable with flavor text as an example.
Script
Scripts are Overworld Events that trigger immediately when the player steps into them.
Naming an object script on an objects layer in a map creates this object.
These are the properties of this event:
cutscene: string-> The name of a cutscene to start when this script event is triggered. Remember to use the group.cutscene notation.script: string-> The name of a script file to run when this script event is triggered.setflag: string-> The name of the flag that will be set tosetvaluewhen the player interacts. You must definesetvalueif you use this property.setvalue: any = true-> The value to set the flag specified byset_flagto.once: boolean = true-> If true, this event will destroy itself when it gets triggered.
If false, you can trigger this event as many times as you want.temp: boolean = false-> Whether the script is temporarily persistent - appears even ifonceis true, and it has been triggered.
Example
I use script in a few examples of other events, like in the path system tutorial or in tile object.
Treasure Chest
To create this Event, place a point or a one tile area on an objects layer and call it chest.
These are the properties of the event:
item: string-> The name of the item contained in this treasure chest - cannot be used in conjunction withmoney.money: number-> The amount of money contained in this treasure chest - cannot be used in conjunction withitem.setflag: string-> An optional flag to set when the treasure chest is opened. Stored as a global flag.setvalue: any = true-> The value to set on the flag specified bysetflag. If this isn't defined, the flag will be set to true.
Examples
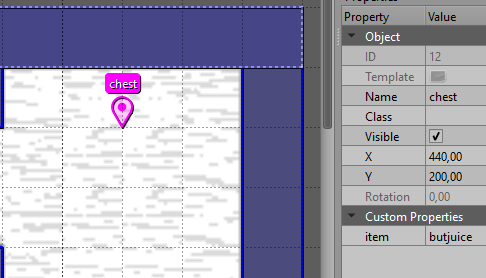
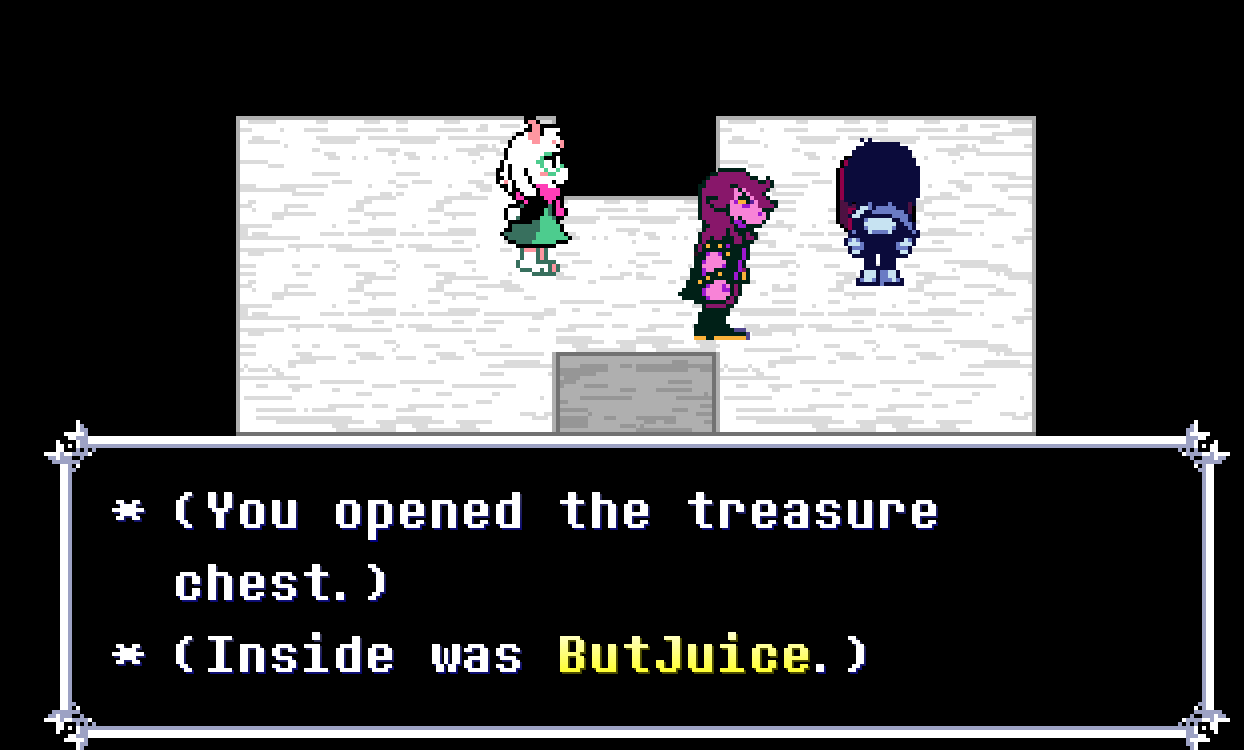
We've already created a chest that gives money, so let's create a chest that gives you an item instead.
Add a point or a one tile area in your map and call it chest, then create a custom property named item and give it the string type.
Then set the value to the name of the item. If you want to use the items that Kristal has by default, go to the folder
where you have cloned the Kristal source code and go to the folder data/items and select the one you want
to use.
Every item has a header with the id of that item, like in the example below. Take that id and paste it on the value of the item property.
local item, super = Class(HealItem, "butjuice") -- butjuice is the id of this item
Cyber trash can
A cyber trash can works the same way as a Treasure Chest, it's an event that either gives you an item or money when you interact with it.
CyberTrashCan is an Event and naming an object cybertrash on an objects layer in a map creates this object.
These are the properties of the event:
item: string-> The name of the item contained in this trash can - cannot be used in conjunction withmoney.money: number-> The amount of money contained in this trash can - cannot be used in conjunction withitem.set_flag: string-> An optional flag to set when the trash can is opened.set_value: any = true-> The value to set on the flag specified bysetflag. If this isn't defined, the flag will be set to true.
Savepoint
These are the stars that allow the Player to SAVE the game.
To create this Event, define a point or a one tile area in an objects layer and name it savepoint.
Savepoint is a child of Interactable, so it inherits all of its custom properties.
These are the properties of this event.
marker: string-> The name of the marker the player will spawn at when respawning to this savepoint. After reloading the game or a Game Over. You should always define this.simple: boolean = Project configuration-> If true, the Savepoint will use its simple version. Without recruits and storage, like in Chapter 1.
If false, the Savepoint will use the menu with these two options.
By default, it uses the value configured in you project properties in the mod.json file.text_once: boolean = false-> If true, the Savepoint will only display the interactable text on the first Interaction.
If false, the Savepoint always display the interaction text.heals: boolean = true-> If true, the party will get healed when interacting with the Savepoint.
If false, the Savepoint won't heal the party.
These are the properties that Savepoint inherits and modifies from Interactable.
solid: boolean = true-> Savepoint always sets this to true, and you can't change this behavior.text: string[]-> The text that will be displayed on a textbox when the player interacts with the savepoint. Tutorial to this propertycutscene: string-> Savepoint doesn't use this property, so don't try to define it.script: string-> Savepoint doesn't use this property, so don't try to define it.setflag: string-> Savepoint doesn't use this property, so don't try to define it.setvalue: any = true-> Savepoint doesn't use this property, so don't try to define it.once: boolean = false-> Savepoint doesn't use this property, so don't try to define it.
Example
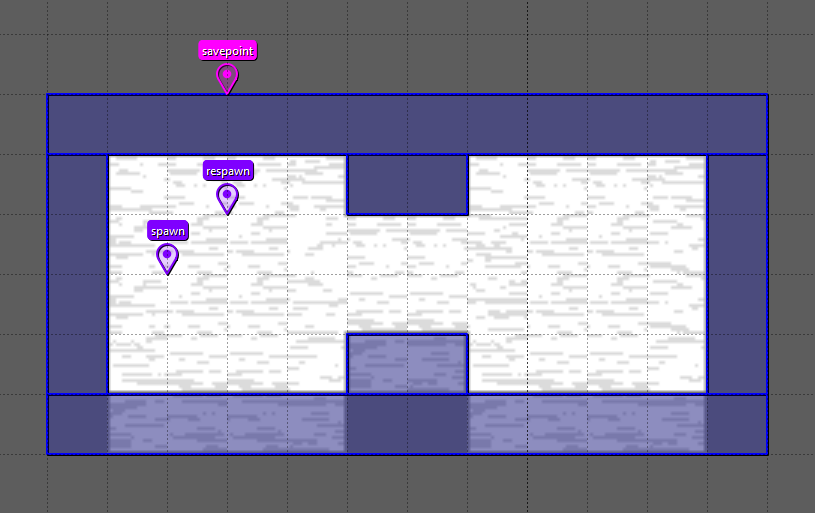
For this example, we have to create the savepoint on an objects layer and the marker that the savepoint will use to respawn as at.
Something like this should work.
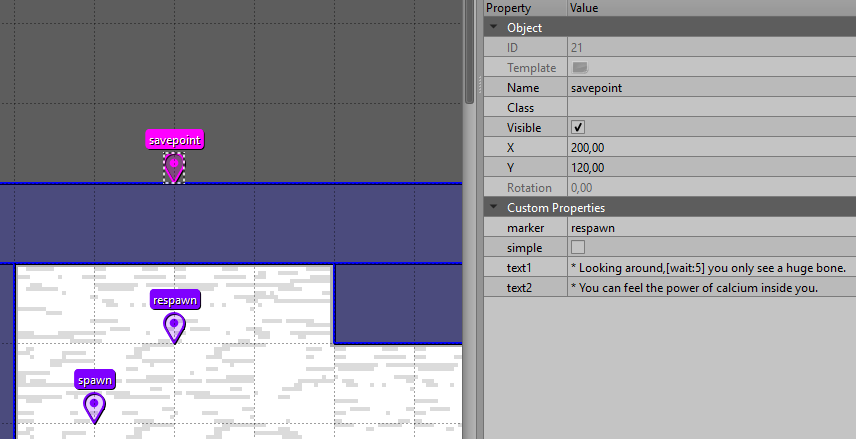
Then add these custom properties:
marker: respawnsimple: falsetext1: * Looking around,[wait:5] you only see a huge bone.text2: * You can feel the power of calcium inside you..
This is how it finally looks.
When you save the game, exit the project and enter again to see if you respawn in the marker.
Use Ctrl+Shift+R to simulate a save reload and Ctrl+B to test a game over.
Transitions
Transitions are objects that allow the player to load other maps or shops.
This Event is an area, so you have to create it using
the rectangle tool on an objects layer and name it transition.
These are the properties that this event has:
map: string-> The name of the map to send the player to.shop: string-> The name of the shop to send the player to.
You can choose to transition to a map or a shop, so only define one in the custom properties.
x: number-> The x position of the map where the player will spawn at.y: number-> The y position of the map where the player will spawn at.marker: string = spawn-> The name of the marker the player will spawn at.
You can either define the x and y position or define a marker where the player will spawn at. The last one is the best option. If you don't define any, the player will spawn at the spawn marker if defined on the new map.
facing: string-> The direction the player will face when spawning in the new map. Can beleft,right,upordown.sound: string-> An optional sound to play when the player activates this transition.pitch: number-> The pitch the entry sound should play at.exit_delay: number-> Additional delay after entering the new map before playing the exit sound, in seconds.exit_sound: string-> An optional sound to play when entering the new map.exit_pitch: number-> The pitch the exit sound should play at.
Example
This example focuses on a map transition, if you want a shop transition, go to the Creating a shop tutorial.
To test this, you first need to create a new map to make the transition to. Follow the creating a map tutorial again, but make the map bigger this time. 50x25 should work. Name the map as you prefer, but for the example I'll call it example_map_2.
Make the map that you want, I made this for the example.
Now, lets go back to the example_map and add the transition and the exit point.
For the example, we'll make a transition to the new map and make it play a sound.
Create a transition object and add these custom properties:
map: example_map_2sound: splatfacing: right
As you can see, we didn't specify where the player will spawn, so the game will use the spawn marker instead.
If you don't define this marker, it will use the middle of the map instead, so always make sure to have this marker.
Usually transition are bidirectional, so let's also add a new point for the other transition to spawn us at. The name doesn't matter, so use whatever name you want!
This is what I ended up making:
Now, lets go to the new map and add the other transition. This time, with these properties.
map: example_mapmarker: exitsound: splatpitch: 2facing: left
Now, let's try out our new transition!
If you want your transitions to feel like the ones on deltarune, place them at the edge of the map, like in this example.
I used the world tool for this example. As you can see, the transitions are outside the boundaries of the map and this creates the illusion that the player is going to another section of the same zone.
Outline
Outline is a region of the map that draws a colored stencil outline for all the character that are inside of that area.
The color of this outline is defined by the Actor of the character in the self.color field.
This Event is an area, and naming an object outline on an objects layer in a map creates this object.
This event doesn't have any custom properties.
Example
First, lets create an area on the objects layer and name it outline.
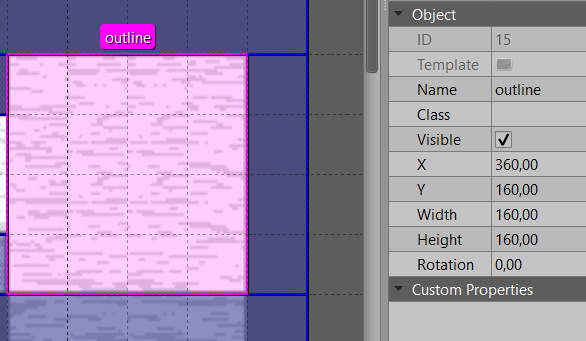
That's it! Now just step into the area with you party like in the image bellow.
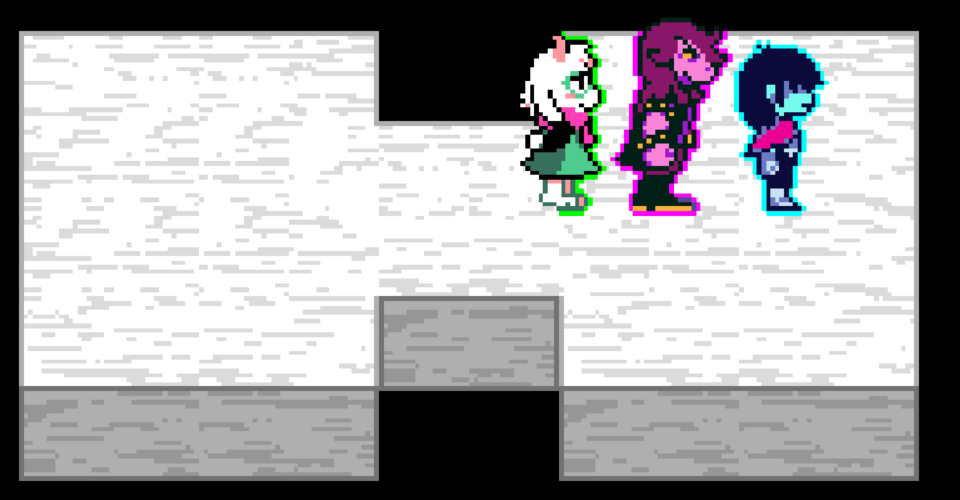
Slide area
A slide area is an area of the map that makes the player slide down when entered.
To create this Event, create an area on a objects layer and name it slidearea.
List of configurable properties for this event:
lock: boolean = false-> If true, the player can't move when sliding down.
If false, the player can move left and right when sliding down.
Example
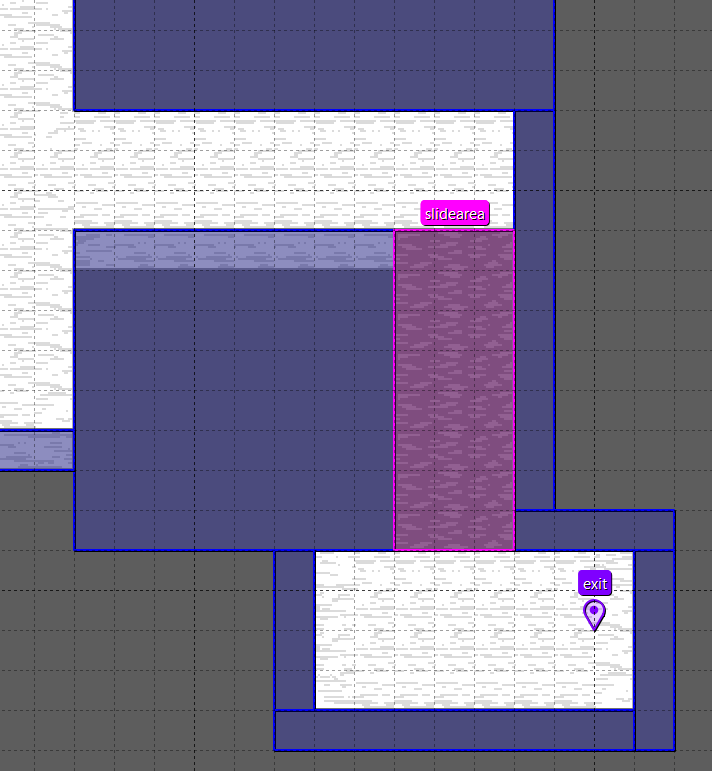
To test this event, modify the current map to add a slide zone, you can use the darker
bones to mark these sections, then add the slidearea like in the example image
and step on this area to test it yourself!
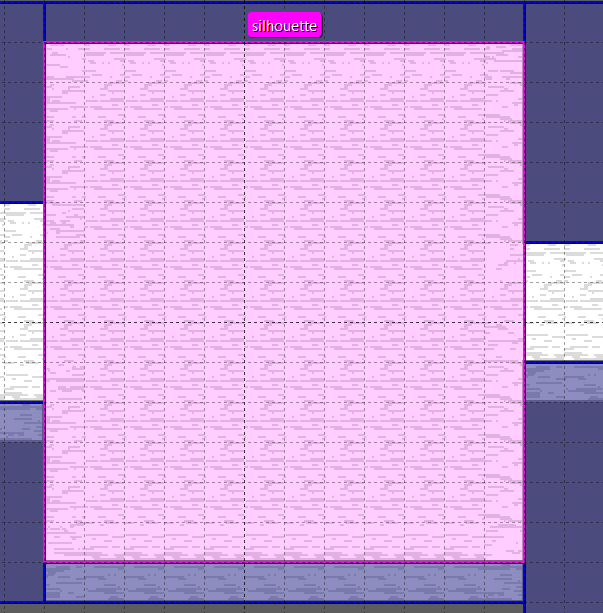
Silhouette
Silhouette is an area Event that draws a silhouette on top of the characters that are inside of the event.
In practice, this dims the color of the characters.
This event is an area and naming an object silhouette on an objects layer in a map creates this object.
This is the custom property of this event:
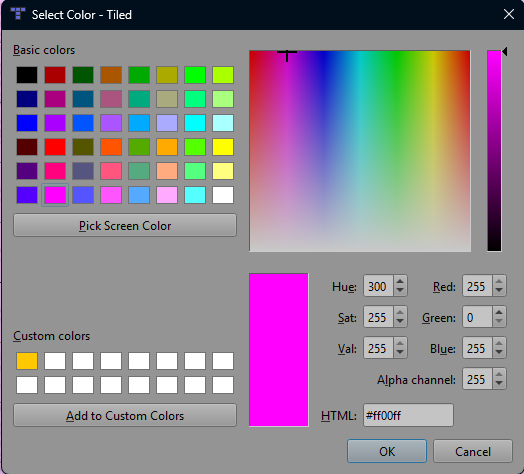
color: color = { 0, 0, 0, 0.5 }-> The color that will be used for the silhouette.
You define this using theColor Tiled type. This is inRGBAformat.
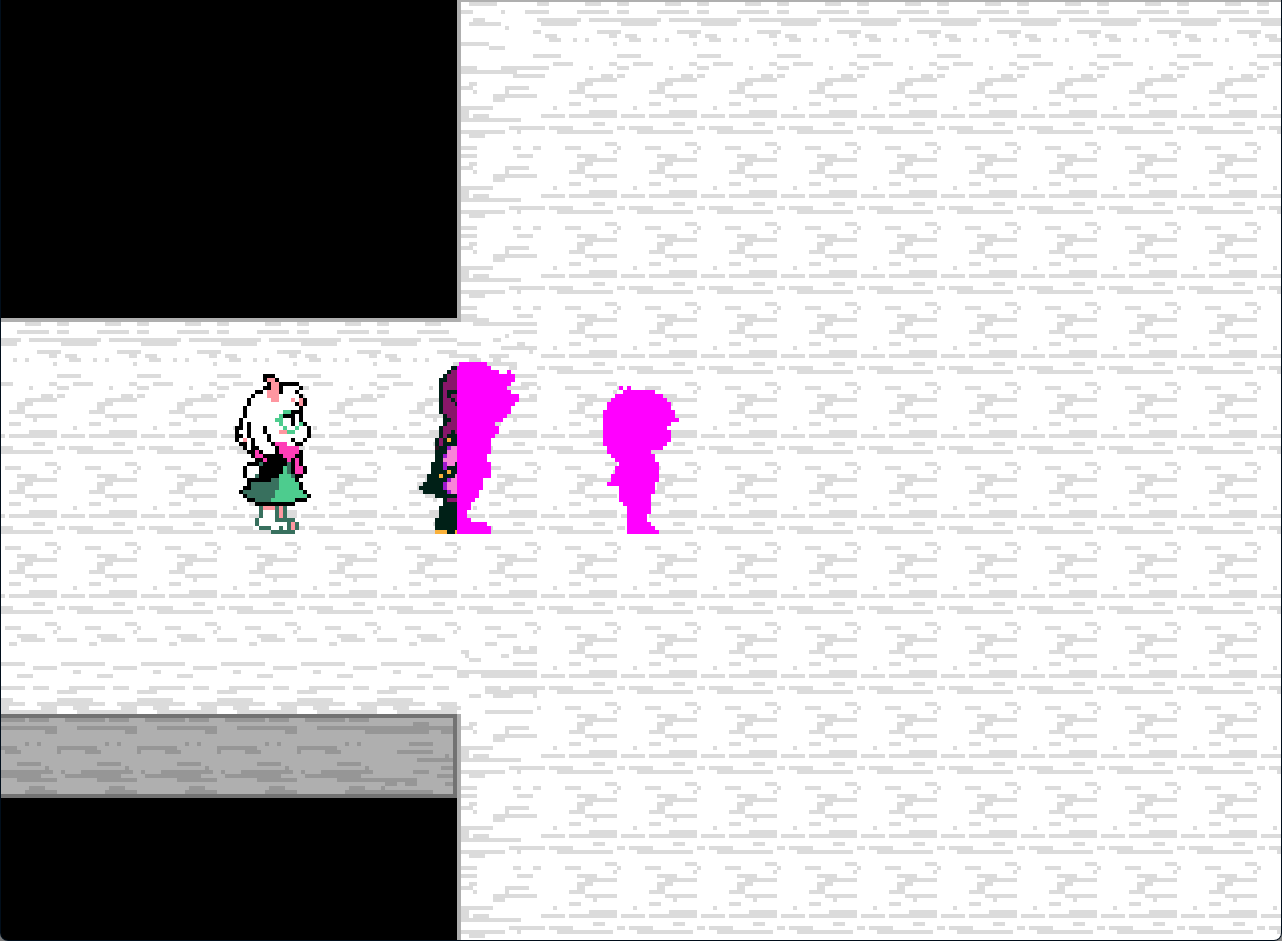
Example
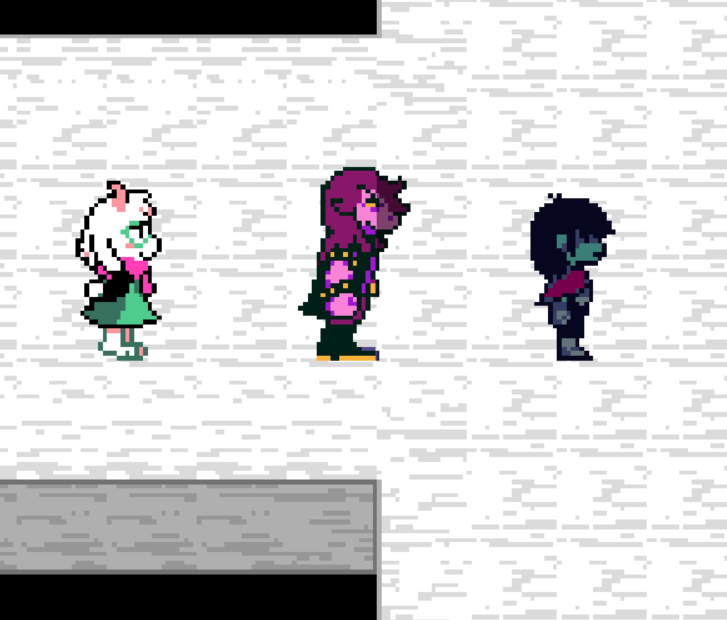
First, create the area that you want in an objects layer and then name it silhouette. Like in the example bellow.
Then this is what happens when you step inside the area of this event.
If you want to customize the color that will be drawn on top of the characters,
you can do so by using the color property. Since this property is of the Color Tiled type,
you define it this way.
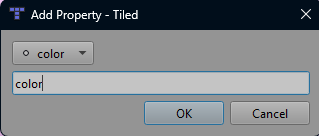
Then choose the color that you want using the color picker.
And this is the result!
Camera target
This Event is a region in the Overworld that causes the camera to target a specific position while the player is inside.
Usefully when you want to make the player focus on an specific object.
This event is an area and naming an object cameratarget on an objects layer creates this event.
List of configurable properties of this event:
x: number-> The x position where the camera needs to focus on.y: number-> The y position where the camera needs to focus on.marker: string-> The name of the marker that tells the position of where the camera needs to focus on.
It's recommended to use a marker instead of raw x and y values because it's simpler and you can move it inside of Tiled.
lockx: boolean = true-> If true, the x position of the camera will be locked to the target position.
If false, the camera will move freely along the x axis.locky: boolean = true-> If true, the y position of the camera will be locked to the target position.
If false, the camera will move freely along the y axis.
These properties are useful if you want to offset the camera instead of just locking it in place.
speed: number = 16-> The speed at which the camera will move to the target position.returnspeed: number = 16-> The speed at which the camera will return to its original target (normally the player).time: number = 0.25-> The time, in seconds, that the camera will take to move to its target position.returntime: number = 0.25-> The time, in seconds, that the camera will take to return to its original target (normally the player).
You can use speed or time to determine how the camera pans to the target position, don't try to use both at the same time, because time takes priority over speed.
If none are given, the camera defaults will be used instead. 16 for speed and 0.25 for time.
Examples
First, let's make an example in which we lock the camera to the center of the room.
To do that, just create the cameratarget and the marker the camera will focus on, then add the target to the
custom properties of the cameratarget.
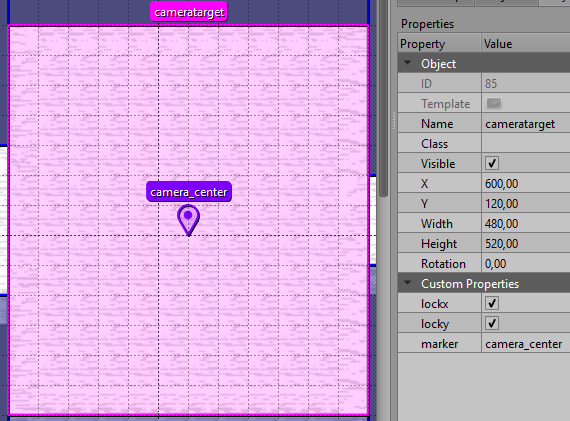
And this is how it looks!
Now let's try to make an offset using this event, to do this just move the cameratarget and the marker,
and put either lockx or locky to false.
This example offsets the y position of the camera a bit, so I changed the name of the marker because the original name didn't actually make a lot of sense for this example.

Hide Party
This event is a region in the Overworld that hides the followers of the player when the player steps into the event.
This event is an area and naming an object hideparty on an objects layer creates this event.
List of configurable properties for this event:
alpha: number = 0-> The target alpha of followers in this region. How transparent they will end up being.
Example
Create an area where you want in the map and name it hideparty, like in this example.
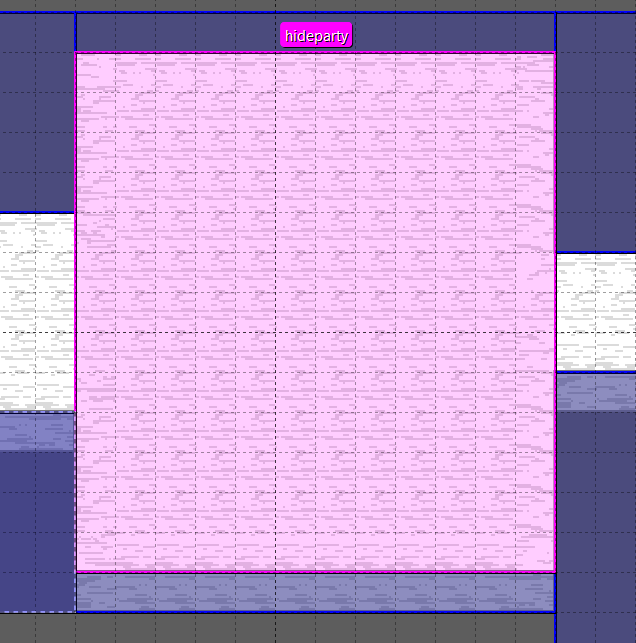
That is it, now just try it!
Set flag event
This event is an Overworld region that sets a flag to a certain value when the player steps into it.
This Event is an area and naming an object setflag on an objects layer creates this event.
List of configurable properties for this event:
flag: string-> The name of the flag that will be set tovalueonce the player enters the area.value: any = true-> The value to set on the flag. If this is not set, theflagwill be set to true instead.once: boolean = false-> If true the event will destroy itself after setting the flag and will not load anymore in the save.
If false the player can step on this event, setting the flag, as many times as they want.mapflag: boolean = false-> If true, theflagwill be saved under the current map instead of a global flag.
If false, the flag will be saved as a global flag.
If you set mapflag to true, the flag will be stored in the Game flags under the current map uid,
if not, the flag will be stored as a global flag.
Example
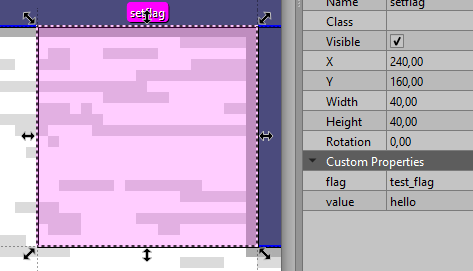
To test this event, you can use the flag editor in the Debug System to see how the flags get created and the value they have.
I'll create some setflag objects with different flags and different types of values to see how they work.
| test_flag | test_flag_2 | test_flag_3 |
|---|---|---|
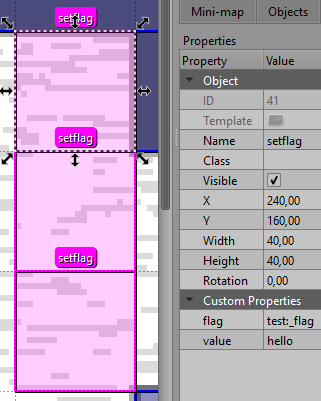 | 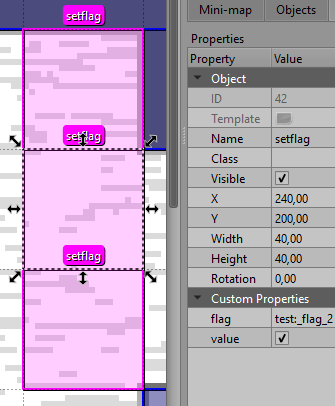 | 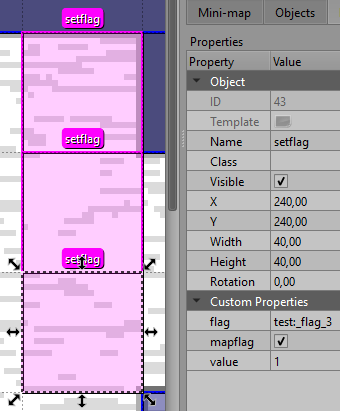 |
| string | bool | int |
This video show how the event works.
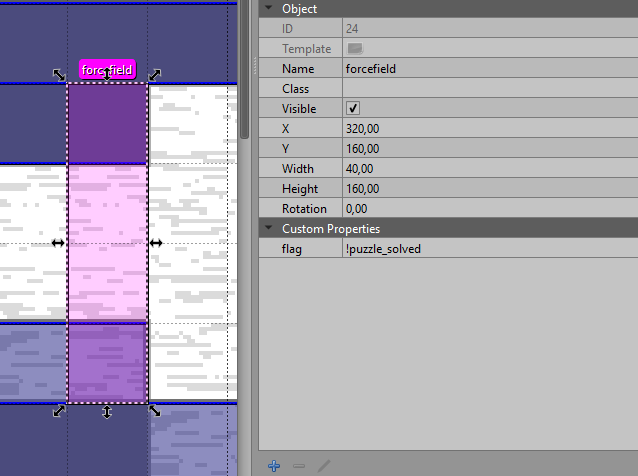
Forcefield
Forcefields are an electrical barrier that stops the player's progression until a certain condition is met. Mainly used to stop the player until they complete a puzzle or reach a certain point on the project.
Forcefield is an Event and naming an object forcefield on an objects layer in a map creates this object.
List of configurable properties:
solid: boolean = true-> If true, the forcefield is solid and the player can't walk through it.
If false, the player will be able to walk through the forcefield.visible: boolean = false-> If true, the forcefield will always be visible to the player.
If false, the player will only be able to see the forcefield when they are close to the object.flag: string-> The name of the flag to check for whether this forcefield is active. If!is at the start of the flag, the check will be inverted.inverted: boolean = false-> If true, the flagcheck is inverted, so ifflag == value, the forcefield is inactive.
If false, whenflag == value, the forcefield is active.value: boolean = true-> The value thatflagshould be for the forcefield to be active.
Example
Since we're not making a puzzle yet, we can use the Set flag event or the debug flag editor to test the forcefield functionality.
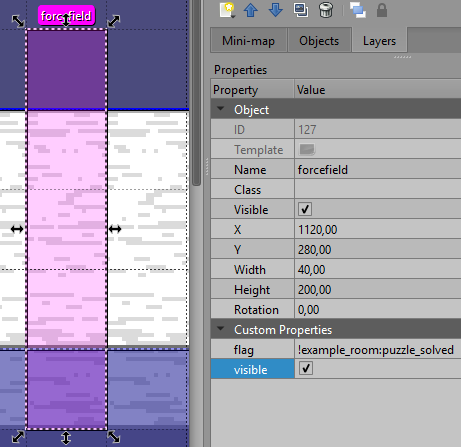
First, let's create the forcefield and add the flag check, we can name the flag "puzzle_solved" for example.
Since we want to logic to be if flag == true, we need to invert the flagcheck.
To do that, we can either use the inverted property or add ! at the start of the name of the flag, something like this:
flag-> !puzzle_solved
OR
inverted-> true
Don't use both, because that's a double negation and it's the same as not putting anything.
You should have created something like this.
Then, let's create the Set flag event to test this:
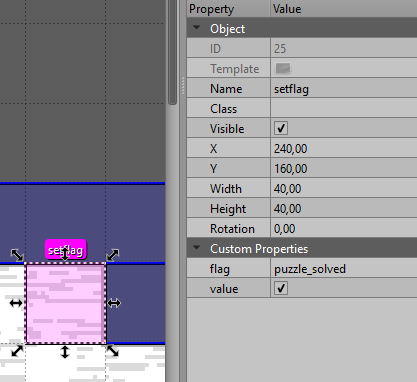
Now, let's test it and see if it works!
At the start, the flag didn't exist, that's why it wasn't showing in the debug menu. After stepping on the set flag, that event created the flag and we could start to modify it in the editor.
Magic Glass
Magic glass are glass tiles that only appear when a character (such as the player or its followers) steps on them.
This Event is an area, and every tile of that area gets transformed to a glass tile. To create this object, create an area in an
objects layer and name it magicglass.
List of configurable properties:
new_sprite: boolean = false-> If true, the glass will use the new sprite. Stored inassets/sprites/world/events/magical_glass_new.1
If false, the glass will use the old sprite. Stored inassets/sprites/world/events/magical_glass.
Example
Since magicglass is normally hidden, we can use it to make a secret pathway towards an inaccessible chest.
Modify the second map to make something like this.
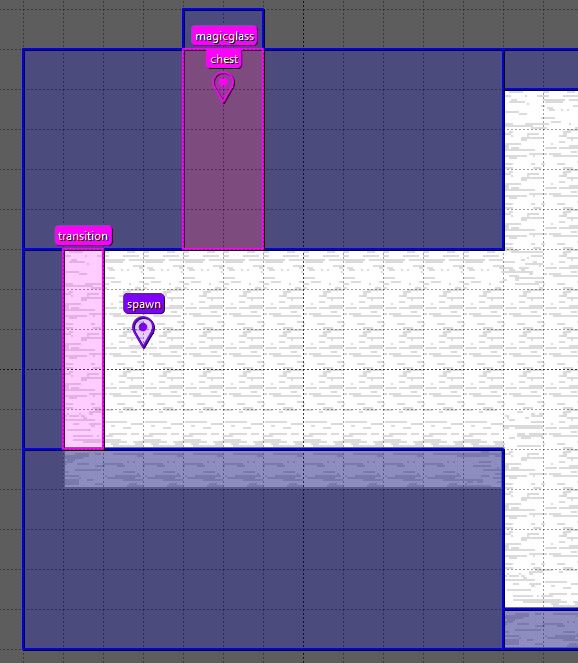
And this should be your result!
Wait... that doesn't look right! Why does the glass tiles show in front of the player and the chest?
That is because both the player an the glass tiles are being drawn on the same layer, so the object that is lower gets drawn first.
This is easy to fix, as seen in the Map Layers Page, we can just
create a new objects layer called objects_party and the party will be spawned on that layer, since we want
the party to be on top of the glass, we'll place this layer on top of the objects layer that the glass uses.
Now... If the glass is now rendering on top of your chest, don't worry, you can just create a new objects layer, I'll name mine
objects_under and now I can change the magicglass to be on my objects_under layer.

If you don't know in witch layer is located an object, use the Select Objects (S) tool in Tiled and
select your object, the layer the object is on will be highlighted in blue.
This should be how everything looks after those changes!
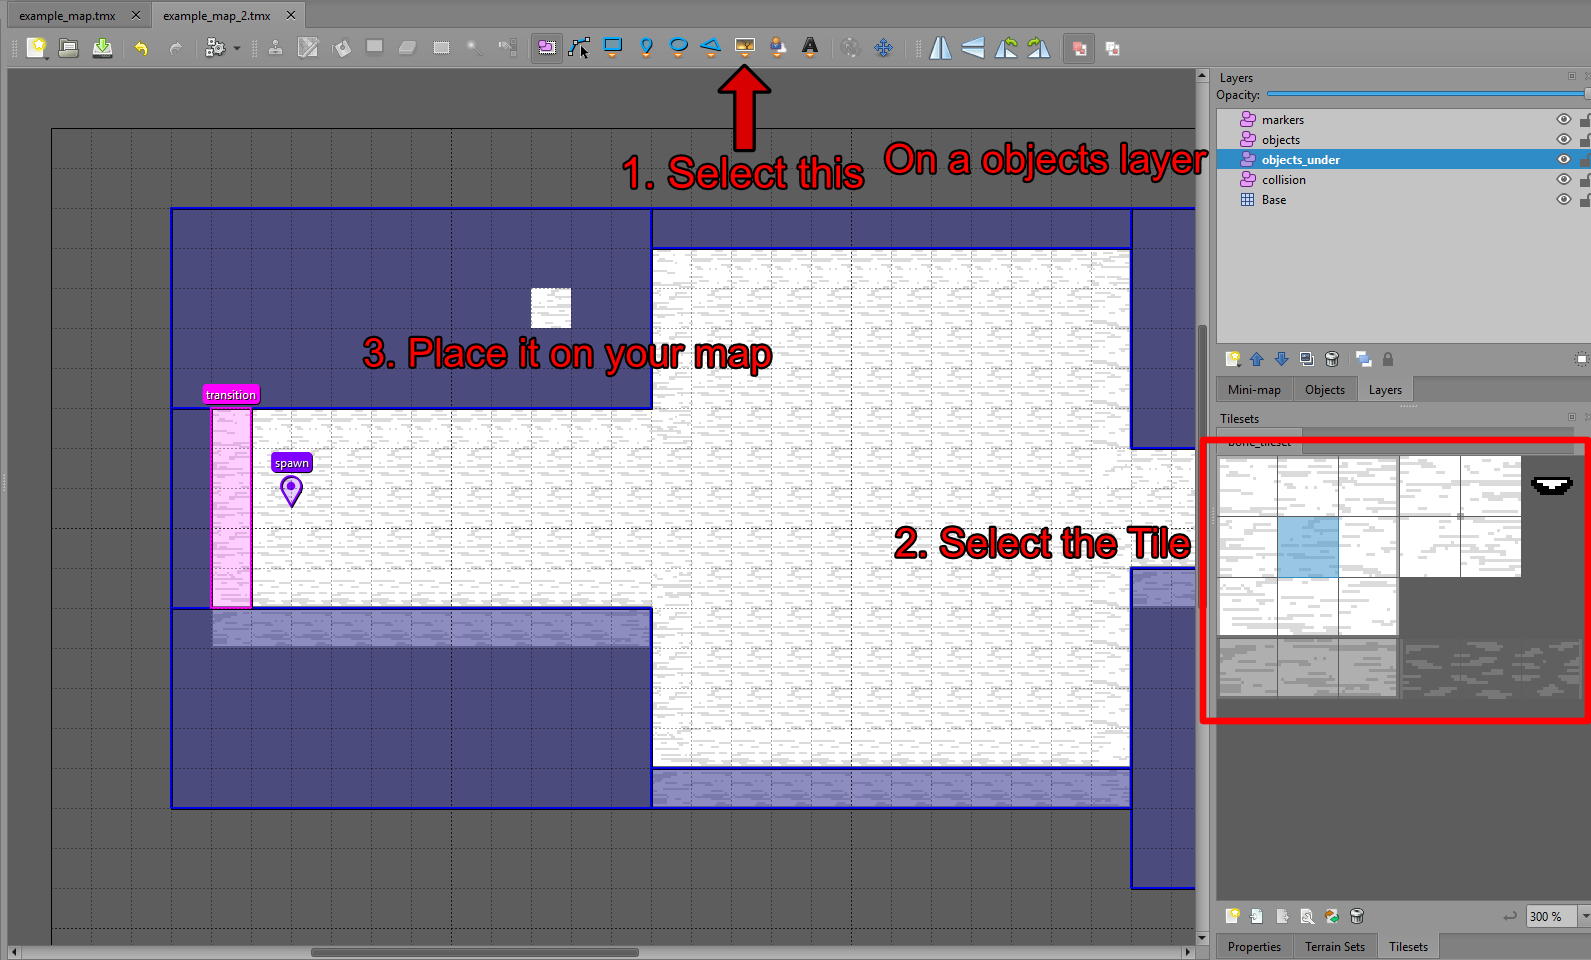
Tile Object
Tile objects are a combination between a tile from a tileset and an Event, this is how you can make a tile that has the properties of an Object.
TileObject is not a normal Event, it has no properties, and you create them using the Insert Tile (T) feature from Tiled
inside of a objects layer. Then select the tile that you want to place from your tileset and place it in the map.
Since the tiles are 20x20px and a tile from the map is 40x40px, you'll need to use the transform controls and scale it to the size that you want.
Example
For this example, let's place a tileobject and create a script to do something with it.
Follow the tutorial bellow if you still don't get how to make them.
Then let's create an script to do something with this tileobject, we'll just modify the script from the script making tutorial to do something like this instead.
---The function that will be executed
---@param event Event The event that executes this script
---@param player Player The player that executes this script
return function(event, player)
--Play an alert sound
Assets.playSound("alert")
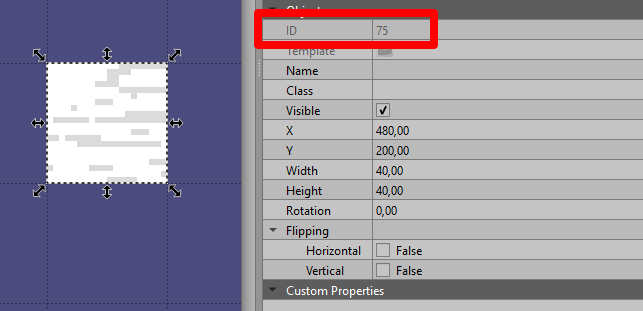
-- Get the tile from it's id
---@type Event
local tile = Game.world:getEvent(75) -- Replace with the id of your tileobject.
--- Shake the object and make it fall upwards
tile:shake()
tile.physics.gravity = -1
end
Since the tileobject is created as an event, you can get access to it using the Game.world:getEvent(id) function. This will give you the object in the map that has that id. If you don't know what the id is, you can look at it in the object properties.
To execute this script, let's just create a script event and set the script property to test_script.
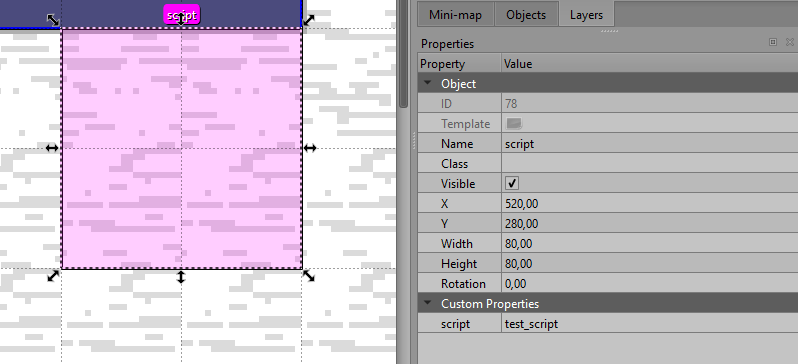
This is how it looks!
Warp Door
Warp doors are objects that allow the player to fast travel between Overworld locations.
To create this Event, place a point on a objects layer and call it warpdoor.
These are the custom properties of this event:
-
open: boolean = true-> If true, the door is open and the player can interact with it to fast travel.
If false, only the door frame appears and the player can't fast travel. -
openflag: string-> The name of the flag to check if the door is open or not. The flag has to be a boolean.
If the flag is true the door is open, and if the flag is false or just doesn't exist (nil), the door is closed. -
map: string[]-> The list of the names of the maps where the player can fast travel to. -
name: string[]-> The list of the names the warp choice will display for each available map. -
marker: string[]-> The names of the markers the door will teleport the player to. -
flag: string[]-> A list of flags to check for to decide whether a map can be warped to or not. This is usefully if you want to allow the player to fast travel in the middle of you project, but not to a latter location.
Examples
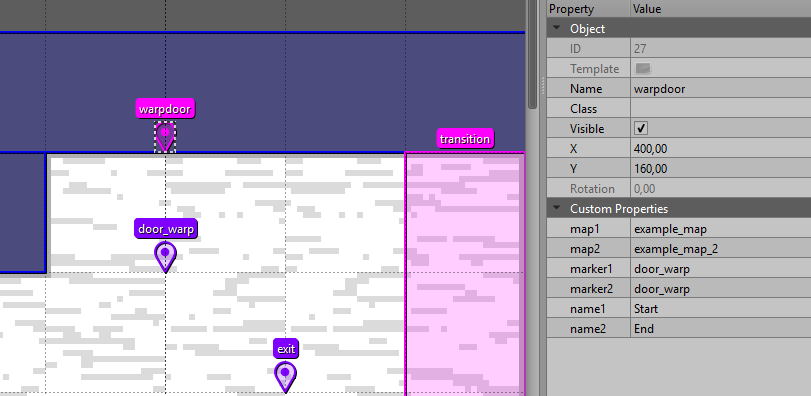
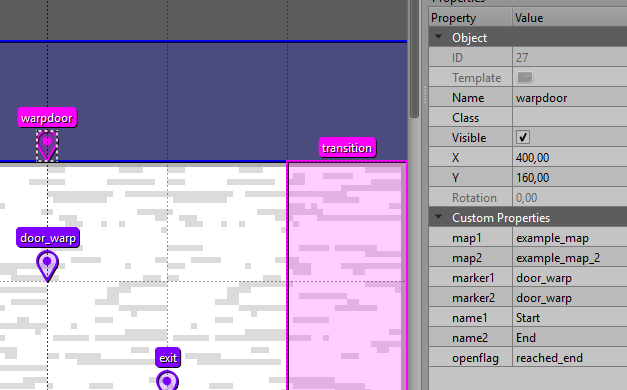
Create a warpdoor in both maps, for this example the door will be open from the start, so the properties are the same for both.
You'll also need to define the markers where the player will be teleported to, I'll name them door_warp to make it simple.
These are the properties, since map, name and marker are arrays, we have to define them as in the
multiple textboxes from the text tutorial.
map1-> example_map -- This is the name of the first map you want to fast travel to.map2-> example_map_2 -- This is the name of the second map you want to fast travel to.name1-> Start -- The name the door will use for the selection of map1.name2-> End -- The name the door will use for the selection of map2.marker1-> door_warp -- The marker the door will teleport the player when they select map1 as the destiny.marker2-> door_warp -- The marker the door will teleport the player when they select map2 as the destiny.
You can define up to four maps, but you'll also need to define map3, map4, name3, name4, marker3 and marker4.
This is how it should look like:
| example_map |
|---|
 |
| example_map_2 |
|---|
 |
And this is how it works!
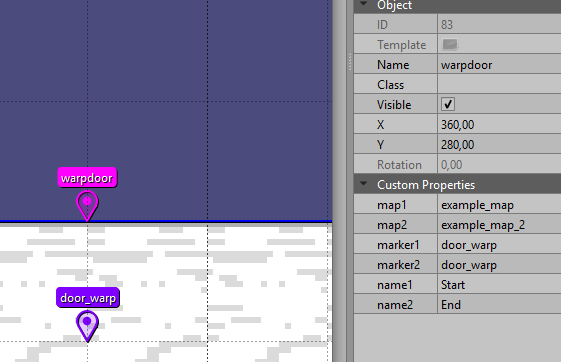
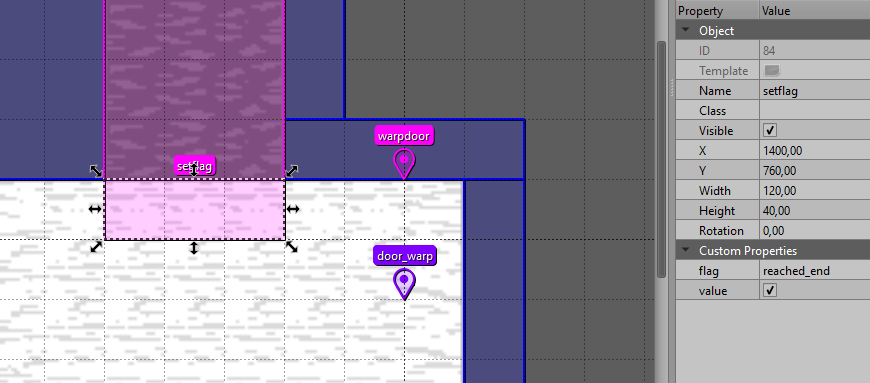
Now... let's try something more complex. Instead of having the doors opened from the start, they'll only open when the player reaches the end.
Modify the door on the example_map and add openflag -> reached_end to its custom properties.
Move the door of example_map_2 to the end and add a set flag event to set the reached_end flag to true.
| example_map |
|---|
 |
| example_map_2 |
|---|
 |
And this is how it works!
Quick Save Event
An overworld object that triggers a Quicksave when entered. You can use this if you want to save flags values after the player game overs.
QuicksaveEvent is an area Event and naming an object quicksave on an objects layer in a map creates this object.
This is the custom parameter of this event:
marker: string-> The name of the marker to use to spawn the party after loading the quicksave. Like in a gameover.
Example
For this example, I'll just create a quicksave and a setflag to see how this works.
| quicksave |
|---|
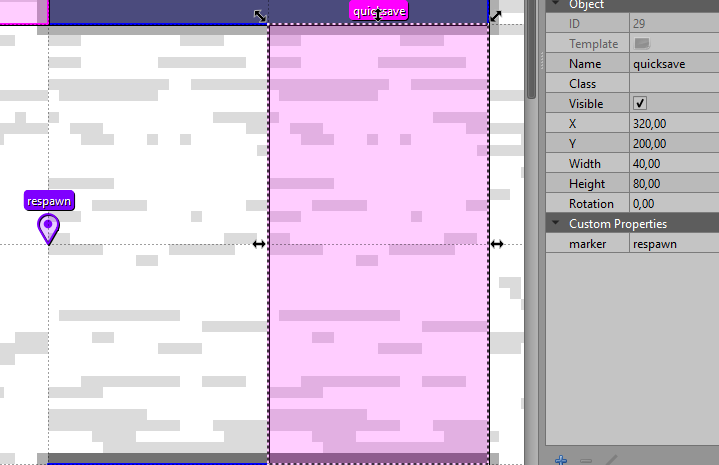 |
| setflag |
|---|
 |
This video uses the Debug features to show what this event does!
Mirror area
A mirror area is a region in the Overworld that reflects the characters bellow it, like a mirror.
MirrorArea is an Event and naming an object mirror on an objects layer in a map creates this object.
You can customize the sprites that get reflected in the mirror in the Actor and
their mirror_sprites table and
functions: getMirrorSprites, getMirrorSprite.
This is the list of the customizable properties of this event:
offset: number = 0-> The y-offset for reflections drawn in this mirror.opacity: number = 1-> The opacity of reflections drawn in the mirror.
Example
For the first example, I'll just create a mirror to show how the event works.
This event is simple to use, just create an area where you want to place your mirror at, like in the image bellow.

That's it! You can see how it works in this video.
For the second example, let's modify the actor data of Kris and modify what are the sprites that are shown in the mirror.
-- Tables of sprites to change into in mirrors
self.mirror_sprites = {
    ["walk/down"] = "walk/down",
    ["walk/up"] = "walk/up",
    ["walk/left"] = "walk/right",
    ["walk/right"] = "walk/left",
}
This is how this looks now, I've increased the size of the mirror a bit to make it easier to see.
Push Block
A pushable block that is usually used to make puzzles, to create this Event, place an area that covers only one tile
in a objects layer and name it pushblock.
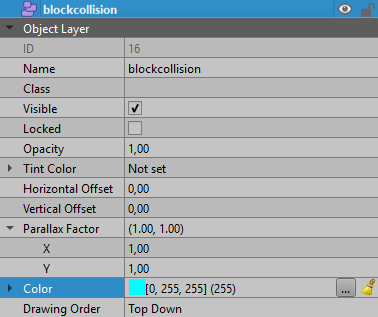
To create the boundaries of where the push block can and cannot move, you need to create a new blockcollision layer,
in this layer you define the collision of the pushable blocks, the player is not affected by this collision.
See the example for more information.
You also should use a different kind of floor to let the player know what are the boundaries of the block.
This is the list of the configurable properties of this event.
sprite: string-> An option custom sprite that the block will use instead of the normal one.
If you want to use the normal sprite, you don't need this.solvedsprite: string-> An optional custom sprite that the block will use when it's on a solved state.
Updated automatically when the block is on top of a Tile Button.pushdist: number = 40-> The number of pixels the block moves per push. 40 is one tile, but this depends on the tile width and tile height of your map.pushtime: number = 0.2-> The time the block takes to move when you push it, in seconds.pushsound: string = "noise"-> The name of the sound effect to play when you push the block.pressbuttons: boolean = true-> This property is unused.lock: boolean = false-> If true, the block will be locked in place when it reaches a solved state (when the block is on top of a Tile Button).
If false, the block can be moved even when on top of a Tile Button, depending on the complexity of your puzzle, you might prefer this behaviour.inputlock: boolean-> If true, the player will be locked in place while the block is getting pushed.
If false, the player can move even if you push the blocks.
If you plan on making a complex puzzle, set this to false to avoid unnecessary pauses.
The default value is defined in the config file of your project, in thepushBlockInputLockproperty.
Example
For this example, I'll make the base of the puzzle and finish it in the Tile Button tutorial, since I need to use both to create a puzzle.
First, I'll create a blockcollision layer in my map and give it the color Aqua. #00ffff (0, 255, 255)
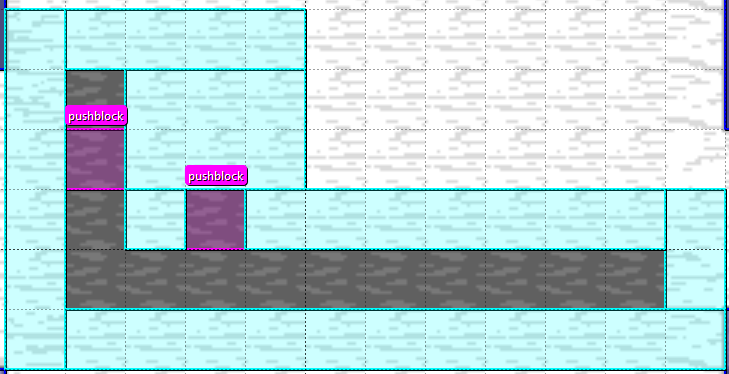
Then, I'll add a pushblock, and define the path that the pushblock can move through. To do that, I'll modify
the map to place the ground where the block can be moved and add the collisions.
I'll also add the inputlock property to the pushable blocks with false as the value.
This is what I've created.
Why don't we try moving our boxes?
Well... that was embarrassing. What do we do now?
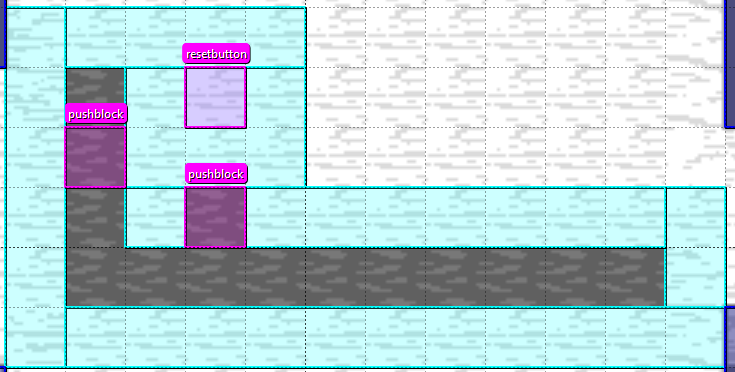
We can walk out off the room to reset the puzzle, but why don't we create a button to reset the puzzle?
I'll create a custom event to make this, but we can actually just use a Tile Button instead! (I'll even replace my custom event with a Tile Button later)
This is the event that I've created.
--- A custom event that resets a pushblock puzzle when stepped on by the player
---@class ResetButton : Event
local ResetButton, super = Class(Event)

---Creates a reset button event
---@param x number The x position of the button
---@param y number The y position of the button
---@overload fun(x : number, y: number) : ResetButton
function ResetButton:init(x, y)

    super.init(self, x, y, 40, 40)

    self.idle_sprite = "world/events/glowtile/idle"
    self.pressed_sprite = "world/events/glowtile/pressed"

    self:setSprite(self.idle_sprite, 1/8)
end

---Called whenever the player enters this event
---@param player Player The character that enters the event
function ResetButton:onEnter(player)
    --- This makes sure that the event only reacts to the Player (Kris)
    if player.is_player then
        self:setSprite(self.pressed_sprite)
        Assets.playSound("noise")
        Assets.playSound("him_quick")

        -- Get every PushBlock in the current scene and reset it
        for _, pushblock in ipairs(Game.stage:getObjects(PushBlock)) do
            pushblock:reset()
        end
        -- Prevets the player for moving while the block are resetting,
        -- if you don't do this, the player
        -- can step where the block are supposed to go and get stuck
        -- in the collision.
        Game.lock_movement = true
        Game.world.timer:after(.4, function ()
            Game.lock_movement = false
        end)

    end
end

---Called whenever the player leaves this event
---@param player Player The character that leaves the event
function ResetButton:onExit(player)
    --- This makes sure that the event only reacts to the Player (Kris)
    if player.is_player then
        self:setSprite(self.idle_sprite, 1/8)
    end
end
Now I only need to add it to the map and test if it works!
Now we have a way of resetting the puzzle, continue with the Tile Button to finish the puzzle.
Tile Button
A button that can be either pressed down by characters or by Push Blocks.
To create this Event, place an area of one tile on an objects layer and name it tilebutton.
This is the list of configurable properties for this event:
sprite: string-> An optional custom sprite to use instead of the normal idle one.pressedsprite: string-> An optional custom sprite to use when this button is pressed instead of the normal one.onsound: string-> The sound effect to use when something steps in the button.offsound: string-> The sound effect to use when the button is no longer pressed down.blocks: boolean = false-> If true, this tile button can only be activated by Push Blocks.
If false, the tile button can only be activated by NPCs, the Player and Followers.group: string|number-> This value is used to group multiple buttons in one room, and they will only be set as completed/solved when all of them are pressed simultaneously.
This is like an ID, so every button in a group needs to have the same group value.flag: string-> The name of a flag to set to true when the button's group is solved and to false when the puzzle stops being solved. This flag will be saved as a global flag.once: boolean = false-> If true, the puzzle of this button can only be completed once per save file. This means that the game will no longer check if the puzzle is completed once it has been solved, and theflagwon't be set to false. You'll mostly prefer this behaviour.
If false, theflagwill be set to false when the puzzle stops being in a solved state.keepdown: boolean = false-> If true, the button will remain pressed even if the object that is pressing it moves away.
If false, the button will go back to being unpressed when the object that is pressing it moves away.cutscene: string-> The name of a cutscene that should play when the button's puzzle is solved.script: string-> The name of a script file that should be executed when the button's puzzle is solved.
Examples
Well... that's a lot of properties so let's go over some examples and videos to help you understand how this event works.
You should do the puzzle in the Push Blocks tutorial because we're going to finish it in this example.
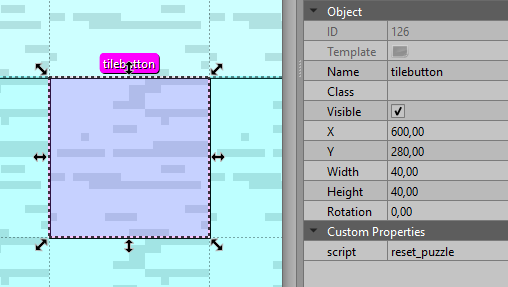
Now that we've created our test puzzle, we're going to replace our reset button with a tile button. To do that, I'm going to add a tile button and give it a new script since I don't want the player to move while the puzzle is being reset.
First, let's create our script, to do that, create a new .lua file in scripts/world/scripts. I'll name mine reset_puzzle.lua.
This is the script that I created.
---Resets every box pushing puzzle in the room
---@param event TileButton The event that executes this script
return function(event)
    -- Since we're calling this script from a Tile Button, we only get the event

    -- This will make it so the TileButton can't be activated with
    -- the followers, only by the player
    -- We can't configure this in the properties since the `blocks`
    -- property only tells if the button can be activated
    -- by the player AND followers not one or the other.
    event.npc_activated = false
    Assets.playSound("noise")
    Assets.playSound("him_quick")
    -- Get every PushBlock in the current scene and reset it to its default
    for _, pushblock in ipairs(Game.stage:getObjects(PushBlock)) do
        pushblock:reset()
    end

    -- Prevets the player for moving while the block are resetting, if you don't do this, the player
    -- can step where the block are supposed to go and get stuck in the collision.
    Game.lock_movement = true
    Game.world.timer:after(.4, function ()
        Game.lock_movement = false
    end)
end
Now just create the object like in this image and test if it works.
Now, let's create the puzzle! To do that, first we'll need to create the barrier that will keep the player from continuing until they solve the puzzle.
We can use a forcefield for this and give it these properties.
flag: string= !example_room:puzzle_solved. Since we're checking when theflagis true, we don't need to give it a value.visible: bool= true
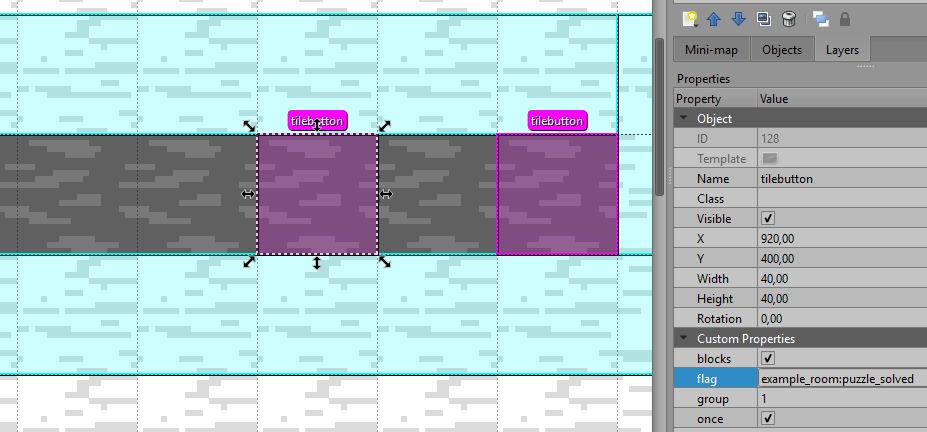
Then let's create the buttons that the puzzle will solve. Since we have two boxes, we'll add two tilebutton with
these properties.
blocks: bool= true. We only want the button to be activated with a pushable box.once: bool= true. Once we solved the puzzle, it can't be unsolved anymore.flag: string= example_room:puzzle_solved. The same flag of the forcefield.group: int= 1. The group id of the buttons, this way, the forcefield will only deactivate when both buttons are being pressed.
Let's test the puzzle and see if it works!
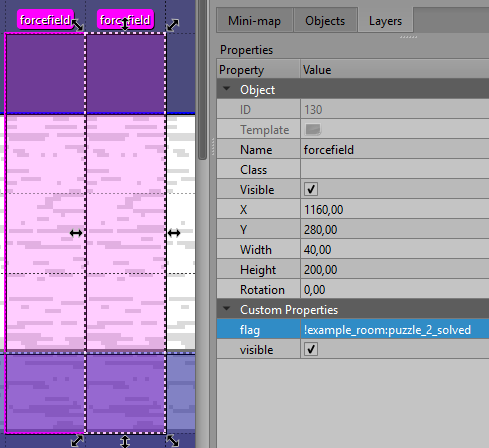
It worked! But why don't we spice things a little bit, why don't we add another puzzle, but this one will be activated when
Kris, Susie and Ralsei step on three buttons. Making this is very simple, we'll add another forcefield, that uses
the flag example_room:puzzle_2_solved and more step buttons.
I'll go step by step on this.
First, create another forcefield with these properties:
flag: string= !example_room:puzzle_2_solvedvisible: bool= true
And then create the new tilebutton with these properties.
once: bool= true. Once we solved the puzzle, it can't be unsolved anymore.flag: string= example_room:puzzle_2_solved. The same flag of the second forcefield.group: int= 2. The group id of the buttons, this way, the puzzle will be solved when all buttons are pressed. This id has to be different from the one in the first puzzle since we want to create independent puzzles.onsound: string= noise
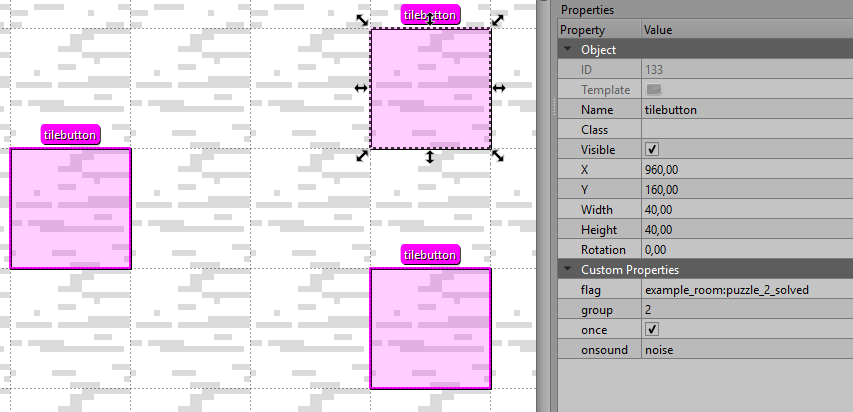
Now... let's try it!
Making Dark fountains
Creating a dark fountain in Kristal is very easy and you only need three parts.
Dark fountain
First we have the dark fountain itself, this is an event, an to create it, place a point in an objects layer and name it darkfountain.
This is the configurable property of this event.
narrow: boolean = false-> This is used if you want to create a narrow dark fountain (like the dark fountain in the first sanctuary of chapter 4) instead of the normal one.
If true, you'll create a narrow dark fountain.
If false, a normal dark fountain will be created instead.
Example
I've created a new map to create the dark fountain, but you can place it in the maps you've already created.
This is what I have so far.
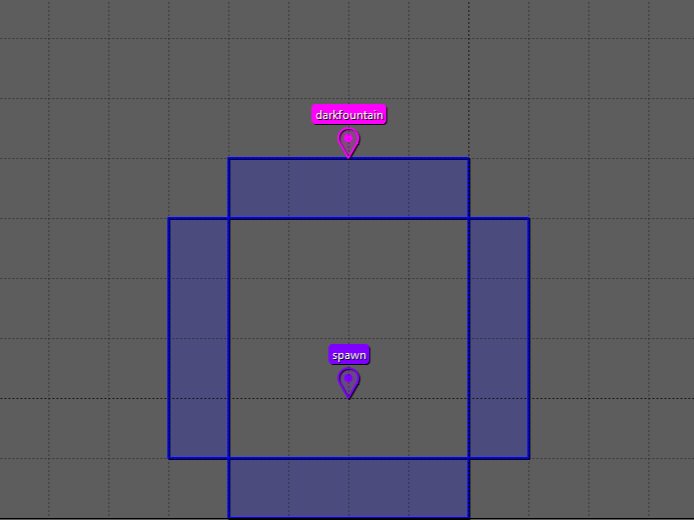
You might think "why doesn't it have a floor?" To answer that, we need to go to the next step in creating a dark fountain.
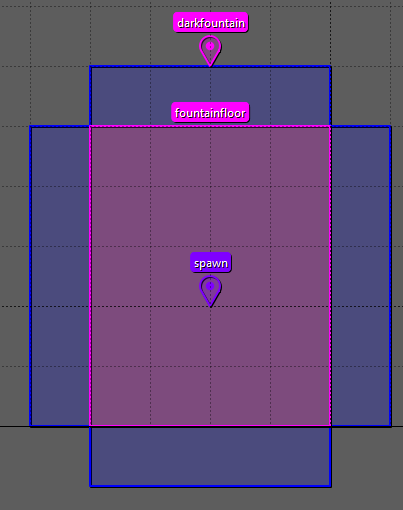
Fountain floor
This is the floor that changes color overtime, following the color of the fountain. You don't need to have a dark fountain in the room to use this object, but if you define one, the color of the floor will sync with the color of the fountain.
To create this event, place an area where you want your floor to be drawn in an objects layer and name it fountainfloor
This event doesn't have any custom properties.
Example
I've modified the room a bit to place this new event, since fountainfloor is an object, make sure that you create it in an
objects layer that's bellow the one the player is drawn at or you might find that the floor gets drawn above the player.
Go to the Magic Glass tutorial if you don't know what I'm talking about.
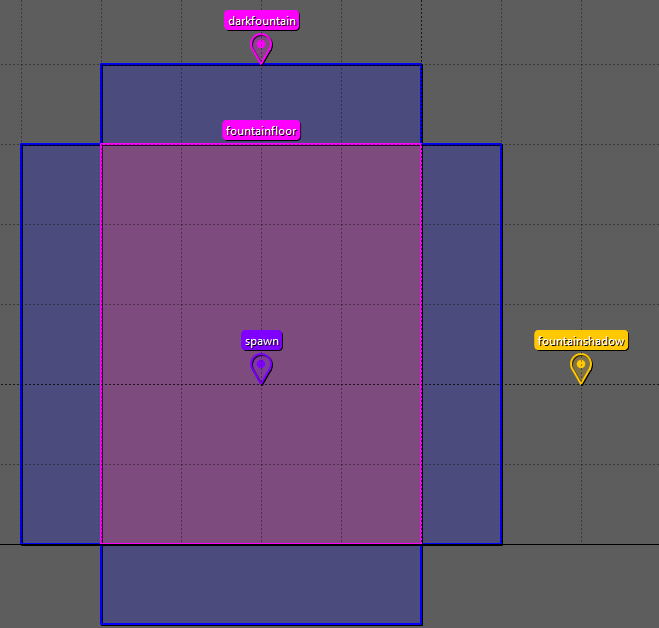
That looks good, but we are still mising an important part of the dark fountain room, the shadow effect of the characters.
Fountain Shadow Controller
Creating this is very simple, insert a point in a controllers layer and name it fountainshadow.
This will add the shadow effect to every character present in the map.
Example
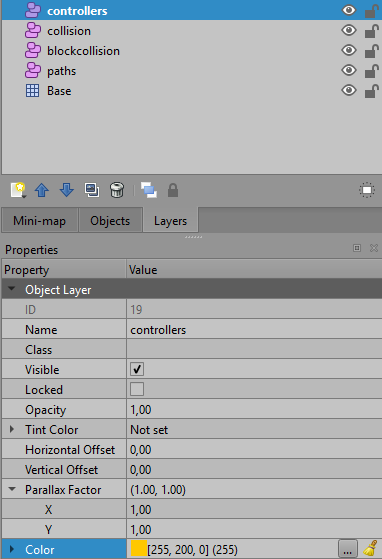
I've added a controllers layer in my map, to make this, create a new object layer and name it controllers.
Use the color that you want, but I'll use a Golden Color. #ffc800 (255, 200, 0)
Toggle Controller
This Event is a controller that toggles the existence of other events in maps on the Overworld.
This controller toggles the existence of other events immediately upon the change of its flag, so it doesn't need a room reload to activate or deactivate other events.
This event is created in a controllers layer and I'll use a Golden Color. #ffc800 (255, 200, 0)
for the examples that uses this layer.
To create this event, place a point on a controllers layer and name it toggle.
These are the custom properties of this controller:
flag: string-> The name of the flag to check for whether the targets should be active or not. If!is at the start of the flag, the check will be inverted. The controller will try to get this flag as a global flag and then as a map flag if it didn't find it.inverted: boolean = false-> If true, the flagcheck is inverted, so ifflag == value, the targets are inactive
If false, whenflag == value, the targets are active.value: boolean = true-> The value thatflagshould be for the targets to be active. If not given, the controller will checkif flag == truetarget: (Character|Event|Collider)[]-> A list of objects that this controller is attached to and is responsible for toggling on or off.
Wait... what does (Character|Event|Collider)[] mean? It simple, target is an array of the objects that the controller can toggle, and those objects can be
events (this includes other characters like npcs) or a collider on the map.
How do you create this property inside of Tiled then? To do this, we're going to use a Tiled type that we haven't use until now, the object type.
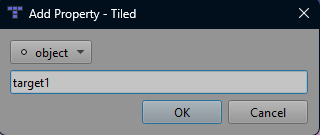
Since target is an array, we can define it like in the multiple textboxes tutorial in the text property.
So create the targets like this: target1, target2, target3, target4, target5, ..., targetN. targetN means that you can have as many targets as you want.
This image show how you can link objects in your map to this property.
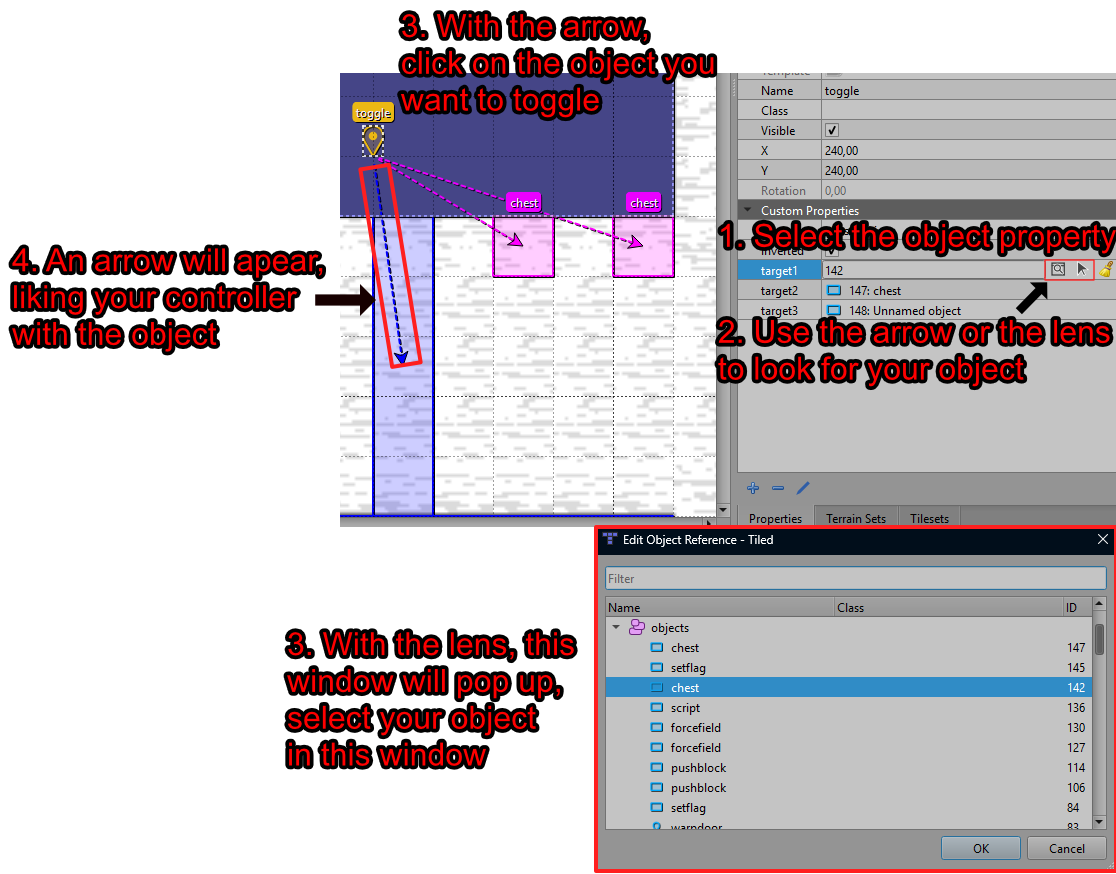
Great photoshop skills, I know.
Now lets go over some examples.
Examples
I've already showed how to link the objects to the toggle, so let's go over an example that show how this works.
I've created a toggle linked to two chests and a collider that blocks the way, I've also given it chest_active as the flag it should check for.
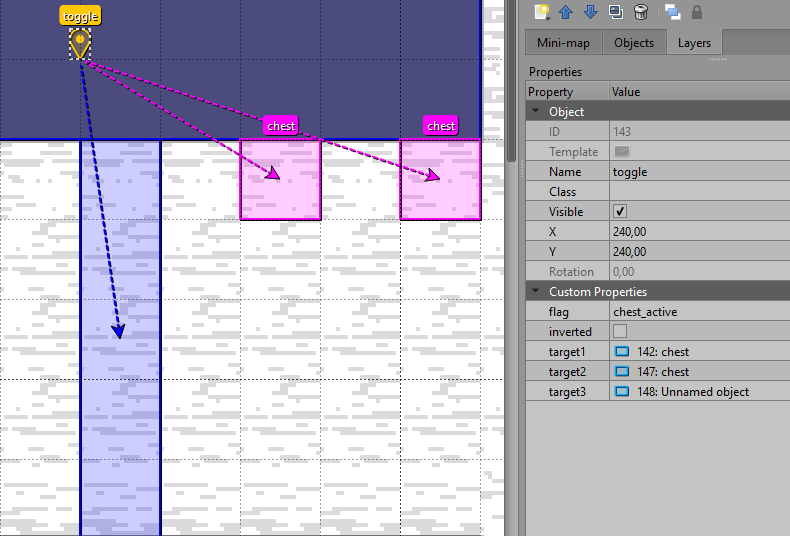
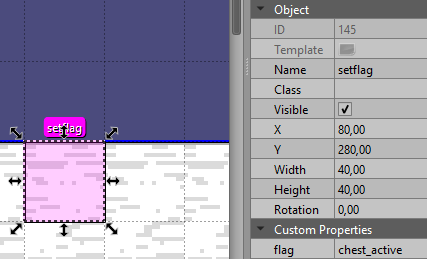
I've also created a set flag event to create the chest_active flag.
This video shows how the toggle works.
Now... lets make another example, but this time with the flag inverted. You can either achieve this using the inverted property or
by putting ! at the start of your flag.
NPC
NPC are an extension of Character that can be placed on a map as if they were an event.
Naming an object npc on an objects layer in a map creates an NPC.
List of configurable properties for this event:
actor: string-> The id of the actor that this NPC uses.sprite: string-> The name of the sprite this NPC should use when Idle.animation: string-> The name of the animation this NPC should use when Idle.
You must define the actor. The NPC will use the idle sprite or idle animation that's defined in the actor properties.
The idle sprite is self.default_sprite and the idle animation is default_anim.
or use self.default instead. But you can define sprite or animation if
you want your NPC to use another sprite or animation as the default instead of the one defined in the actor data.
facing: string = "down"-> The direction the NPC should be facing by default. Can beup,down,rightorleft.turn: boolean = false-> If true, the NPC should turn towards the player when interacted with.
If false, the NPC always looks as defined infacing.
If you enable turn, make sure that the sprite your NPC is using is a facing sprite. I'll use the same tutorial that's in Chaser Enemy to explain what a facing sprite is.
Lets stop here for a bit, what does mean having a facing sprite? We'll use kris sprites as an example. Head over the folder assets/sprites/party/kris/dark in Kristal.
If we look into the walk folder, you can see that we have sprites for all four directions left, right, up and down.
So if we create an NPC with kris as the actor we can set facing and the game will use one of these four sprites,
depending on the facing value. But you don't have to create a separate folder to do this. When the game checks if an sprite is a facing sprite, it uses two
kinds of separators _ and /. So you can either define the sprites as animation_direction like walk_down, walk_up, walk_left and walk_right
or create a folder with the name of the sprite and place the sprites inside, naming them left, right, up and down.
talk: boolean = true-> If true, the NPC does a talking animation when interacted and typing in the dialogue.
If false, the NPC doesn't do this animation. This is explained in the examples.talksprite: string-> The name of a talk sprite to use for the NPC when talking. Set this to the name of the sprite you want to use for talking instead of the default one.solid: boolean = true-> If true, the NPC is a solid object and the player can't walk through it.
If false, the player can walk through the NPC.cutscene: string-> The name of a cutscene to start when interacting with this NPC. Remember to use the group.cutscene notation.script: string-> The name of a script file to run when interacting with this NPC.text: string[]-> The text to be displayed when interacting with this NPC. Works the same way as in the text tutorial.
Don't use script, cutscene and text in the same NPC, only use one.
setflag: string-> The name of the flag that will be set tosetvaluewhen the player interacts. You can definesetvalueif you use this property.setvalue: any = true-> The value to set the flag specified byset_flagto.path: string-> The name of the path shape that the NPC will follow. Use the Path system tutorial as a reference.speed: number = 6-> The speed that the NPC will move along the path specified inpath, if defined. This can be a float.progress: number = 0-> The initial progress of the NPC along theirpath, if defined, as a decimal value between 0 and 1. 0 being the start of the path and 1 the end of the path. This can be a float.
Examples
First, we need to create a new actor to use as an npc or use one that is already defined.
You can create the actor for the new npcs in scripts/data/actors and store the assets in assets/sprites/npcs.
Since a new project already comes with starwalker as an NPC, we can use it for this example.
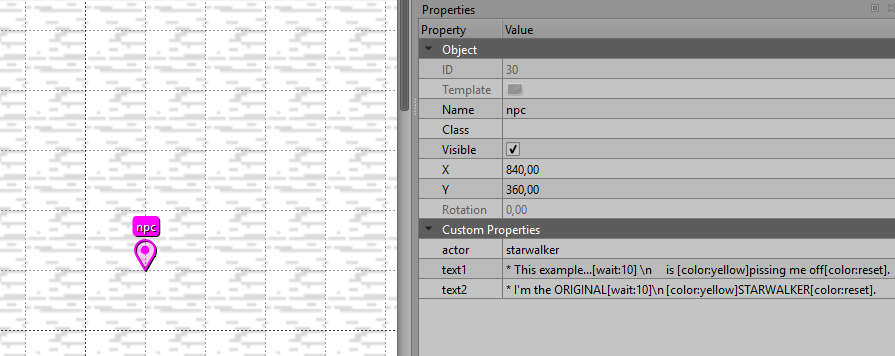
To create this simple NPC, make a new point or one tile area named npc in an objects layer and define these properties.
actor: starwalkertext1: * This example...[wait:10] \n is [color:yellow]pissing me off[color:reset].text2: * I'm the ORIGINAL[wait:10]\n [color:yellow]STARWALKER[color:reset].
We've added some text to create an interaction with this NPC (don't forget to add the spaces),
and defined the actor that it uses as starwalker.
As you can see, this creates a starwalker npc with the text as an interaction. But what if we want starwalker to turn
towards the player when you talk to them from the side?
Doing that is easy, but we need to organize our npc first, to do that, make a new folder inside of assets/sprites/npcs
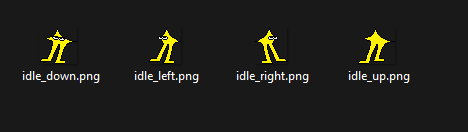
and call it starwalker. Then, inside the folder, we're going to add new sprites for starwalker directional talk.
These are the sprites that I made, just copy them into the folder you just made with the name of the headers.
| idle_down | idle_up | idle_left | idle_right |
|---|---|---|---|
 |  |  |  |
You should have something like this in the folder assets/sprites/npcs/starwalker
Now we need to modify the actor data of starwalker and place the idle sprites as the default sprites it uses.
-- In the file "scripts/data/actors/starwalker"
local actor, super = Class(Actor, "starwalker")
function actor:init()
...
    -- Path to this actor's sprites
    self.path = "npcs/starwalker"
    -- This actor's default sprite or animation, relative to the path.
    self.default = "idle" -- You just need to modify this
...
end
return actor
You'll need to add the custom property turn to the npc, so it knows to use the directional sprites.

And this is the result!
Now... let's add a talk sprite to starwalker, doing this is very simple, you just need to add a few extra fames of animation and name it a certain way, Kristal will do the rest.
| idle_down1 | idle_down2 | idle_up1 | idle_up2 |
|---|---|---|---|
|  | |  |
| idle_left1 | idle_left2 | idle_right1 | idle_right2 |
|---|---|---|---|
|  | |  |
This is what your npc folder should look like.

Since the talk property is set to true by default, we just need to modify the actor data and let the engine
know the speeds at which it should do the talking animations.
-- In the file "scripts/data/actors/starwalker"
local actor, super = Class(Actor, "starwalker")
function actor:init()
...
-- Table of talk sprites and their talk speeds (default 0.25)
self.talk_sprites = {
    ["idle_down"] = .25,
    ["idle_left"] = .25,
    ["idle_right"] = .25,
    ["idle_up"] = .25,
}
...
end
return actor
This is what your npc should look like.
You can always define talksprite if you want your NPC to use other sprites for the talking animation instead of the
default one.
This tutorial should give you a good example on how to create an NPC in your map, so I hope it was helpful!
Chaser Enemy
Chaser enemies are the enemies that you encounter in the Overworld and start an encounter when you collide with them. This is a complex event, so I hope this tutorial helps you implement your enemies in you project.
A Chaser Enemy is not an extension of Event, it's an extension of Character but they are created like an Event.
To create an enemy, place a point or a one tile area in an objects layer and name it enemy.
These are the configurable properties of this object:
actor: string-> The actor ID of this enemy, used to display the enemy in the map. If you don't want you project to crash, define this.sprite: string-> The sprite to use for this enemy instead of the default sprite defined in the actor data.animation: string-> The animation to use for this enemy instead of the default animation defined in the actor data.facing: string-> The facing direction of the enemy, if you have a facing sprite. Can beleft,right,upordown.
Lets stop here for a bit, what does mean having a facing sprite? We'll use kris sprites as an example. Head over the folder assets/sprites/party/kris/dark in Kristal.
If we look into the walk folder, you can see that we have sprites for all four directions left, right, up and down.
So if we create an enemy with kris as the actor we can set facing and the game will use one of these four sprites,
depending on the value. But you don't have to create a separate folder to do this. When the game checks if an sprite is a facing sprite, it uses two
kinds of separators _ and /. So you can either define the sprites as animation_direction like walk_down, walk_up, walk_left and walk_right
or create a folder with the name of the sprite and place the sprites inside, naming them left, right, up and down.
encounter: string-> The encounter ID that will trigger when the player collides with the enemy. Stored inscripts/battle/encounters.enemy: string-> The enemy ID to use for this enemy. Stored inscripts/data/actors.
Wait... why do we need to define theenemyif we also define theactor? I don't really know, but I can tell you what they do. The actor is used for the sprite that's in the overworld and to make the transition to the battle, while enemy is added to the enemies that transition into battle, along with the actor.group: string-> An arbitrary ID that can be given to multiple enemies and make them group together. So when the Player defeats that encounter, all the enemies on that group are unloaded from the map.path: string-> The name of the path shape that the enemy will follow. Use the Path system tutorial as a reference.speed: number = 6-> The speed that the enemy will move along the path specified inpath, if defined. This can be a float.progress: number = 0-> The initial progress of the enemy along theirpath, if defined, as a decimal value between 0 and 1. 0 being the start of the path and 1 the end of the path. This can be a float.chase: boolean = false-> If true, the enemy will chase the player when it catches sign of them.
If false, the enemy won't chase the player in any case.chasing: boolean = false-> If true, the enemy will start chasing the player as soon as they enter the room.
If false, the enemy will move as configured in the other properties.chasedist: number = 200-> The distance, in pixels, that the enemy can see the player from. So when the player distance to the enemy is less thatchasedist, the enemy will start chasing the player ifchaseis set to true.chasetype: string = linear-> How the enemy will chase the player. This property has multiple values you can give it:linear-> The enemy will chase the player at a constant speed unless achaseaccelis given. In that case, the speed is multiplied by the acceleration each frame.multiplier-> The enemy speed is exponential to the time it has been chasing the player.flee-> The enemy will run away from the player at the same speed as in linear.
If you don't get the difference from linear to multiplier, don't worry, you just need to know
that the chase speed of the enemy will increase a lot faster when using the multiplier chasetype.
chasespeed: number = 9-> The speed the enemy will chase the player at, in pixels per frame at 30FPS.chaseaccel: number-> The acceleration of the enemy when chasing the player. Inlinearmode, the speed is multiplied by the acceleration each frame, but inmultipliermode, the speed is powered to the acceleration each frame.chasemax: number-> The maximum speed the enemy will chase the player at, this is only applied ifchaseaccelis also set.
As you can see, chasing is a bit complex, so I'll make some examples to make them easier to understand. This is the mechanic that uses the enemycollision layer,
but more of that in the examples.
-
once: boolean = false-> If true, the enemy will not spawn anymore once its encounter has been done.
If false, the enemy will spawn when the room loads, even if you've done its encounter. -
aura: boolean-> If true, the enemy will have an aura around it as seen in the enemies in Chapter 2.
If false, the enemy won't have this aura around it.
The default value of this is set in the config file of your project. In the enemyAuras property. -
pacetype: string-> The type of pacing that the enemy will do while it's not chasing down the player. This property has multiple values you can give it:wander-> Wanders between the enemy spawn point and several markers in a fixed order.randomwander-> Wanders between the enemy spawn point and several markers at random.verticalswing-> Moves along a sinusoidal wave on the y-axis. So it moves up and down.horizontalswing-> Moves along a sinusoidal wave on the x-axis. So it moves left and right.
Depending on the pacetype that you want to use, there are exclusive properties that define how these behave.
If you use wander or randomwander:
marker: string[]-> A list of markers that the enemy will move between, in order when usingwanderand at random when usingrandomwander.
Since this property is an array of strings. You must define it usingmarker1,marker2,marker3, ...,markerN. The value of each marker is the name of that marker.paceinterval: number = 24-> The number of frames the enemy will stay in each marker before going to the next one.pacereturn: boolean = true-> If true, the enemy will return to its spawn point every time it reaches a marker.
If false, the enemy will continue to the next marker, instead of returning to its spawn point.pacespeed: number = 2-> The speed at which the enemy moves when wandering.
If you use verticalswing or horizontalswing:
swingdiv: number = 24-> A divisor for the speed of the swing of this enemy (Higher number = slower).swinglength: number = 400-> The full length swing covered by this enemy, in pixels. The starting position of the enemy is the center of the line.
Okay, that was a lot, so let's go over some examples to understand how this object works.
Examples
First, let's create a base enemy that we can test things on.
Since the starting project already comes with a dummy encounter, we're going to use it.
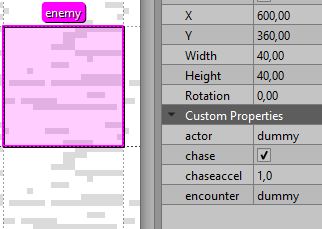
Create the enemy where you want and give it these base properties.
actor: dummyencounter: dummy
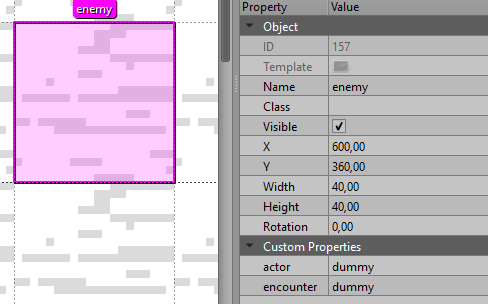
This creates a basic enemy we can interact with to start an encounter.
Chasing down the player
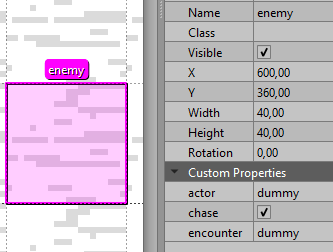
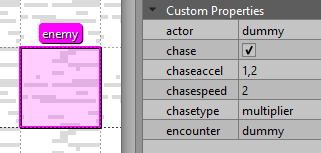
Now we can make the enemy chase the player down. Just enable chase and we'll test every type of chasing.
Linear chasing We're going to test it without acceleration first with these properties.
chase= truechasetype= linear. Not really needed, since linear is the default.
Now... with acceleration.
chaseaccel= 1
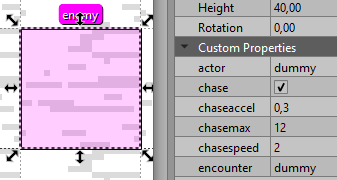
Let's try to actually make the enemy avoidable by the player.
chasespeed= 2chaseaccel= 0.3chasemax= 12
Okay... that is not really avoidable is it? We go faster than the enemy at first, but it ends up reaching us in the end.
But don't worry, there is a way to make boundaries that only affect enemies, enemies are affected by colliders, but we can't really use colliders to bound the enemy, because that will also affect the player, instead we can use a special kind of collision that only affects the enemies.
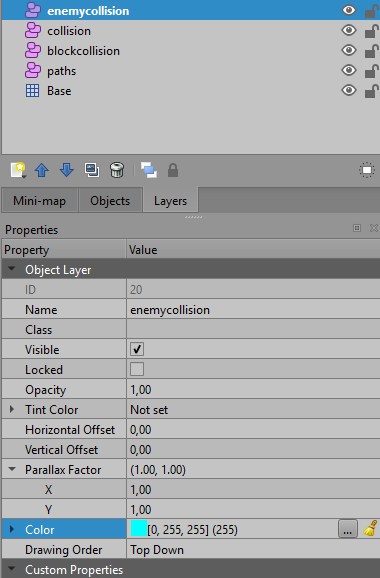
To create this collision, create a new object layer in Tiled, starting with enemycollision as the name, then you can use this layer as
a normal collision layer, but the collisions you define in this layer will only affect enemies.
I'll create this layer and color it Aqua. #00ffff (0, 255, 255)
Now... let's add the boundaries!
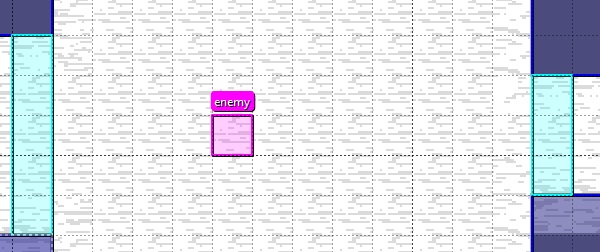
Let's see if we can avoid the enemy now.
Now, we'll test the multiplier chasetype, we have to change the acceleration to a value bigger than 1, I'll also remove the speed limit to see how the multiplier chasetype functions. This is explained in the speed calculation:
self.chase_speed = self.chase_init_speed * math.pow(self.chase_accel, self.chase_timer)
Since we do acceleration to the power of the time the enemy has been chasing, a value <= 1 will give 1 or a extremely small number, giving 0 speed or the normal speed.
This other video is using the linear chasetype, everything else is the same.
As you can see in the end, the enemy looks to be moving much faster when using the multiplier chasetype.
Moving the enemy
There are multiple ways of making the enemy move in the overworld.
We'll test the path system first, along with understanding how groups work.
Create the path shape that you want, this is the one that I've done.
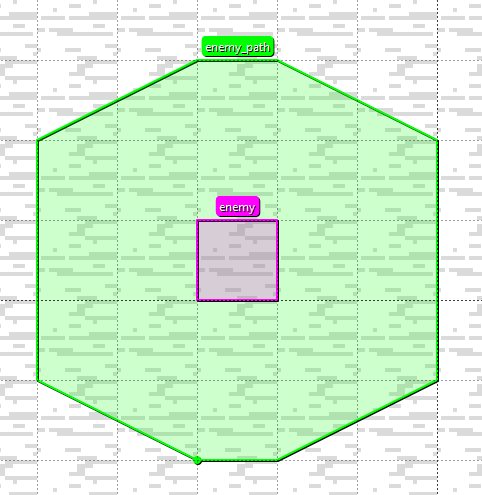
Then we're going to create the other enemy and modify the properties to create the enemy that we want.
Since we're going to test the group property, make sure that both of the have the same group.
You'll also need to modify the dummy encounter and add another dummy.
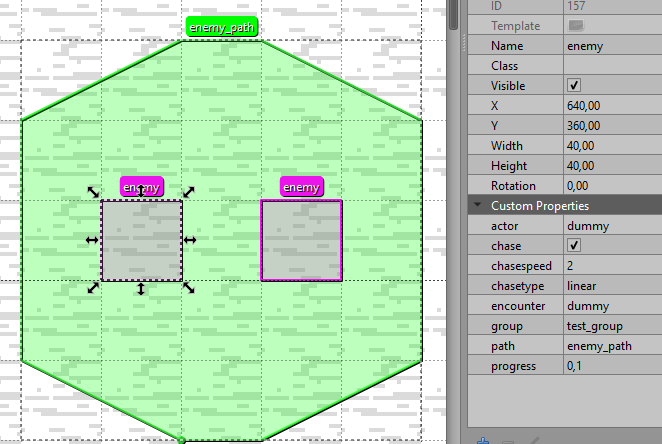
Modify the progress of the second enemy so they don't overlap, and this is how it looks in Game!
As you can see in the end, since both enemies are in the same group, once we finished the encounter, both enemies disappear from the map.
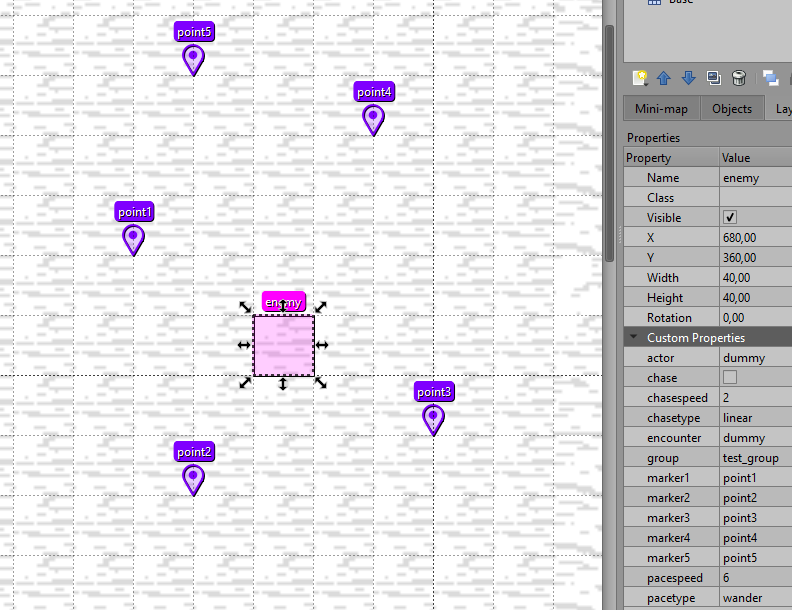
Now, we'll test the wander and randomwander pacetype. Since both of them require a list of points for the enemy to wander to, let's first create those markers.
The marker property is an array of strings, so define the using marker1, marker2, marker3, ..., markerN.
This image shows the points I've created and how I've assigned those markers to the enemy.
With that done, we can test the wander pacetype, since we haven't defined pacereturn, it will be set to true.
I've speed up the Game to make it faster to see.
Now let's test what happens when we set pacereturn to false.
As you can see, the enemy now goes to every marker and then returns home when it reaches the last one.
Now let's test the randomwander pacetype type, just set the property pacetype to randomwander. I'll also set pacereturn as true.
The last thing we have to test, are the verticalswing and horizontalswing pacetype. Both of them have the same parameters, it just changes the way that they move, with verticalswing, the enemy will go up and down and with horizontalswing, the enemy will go right and left.
First, let's test verticalswing to do this, set pacetype to verticalswing, I'll also change swinglength to 200.
Now with horizontalswing, set pacetype to horizontalswing. This time I'll set swinglength to 300 and swingdiv to 12.
This will make the enemy move more distance and at double the speed.
That should be all for this object, so I hope this tutorial was helpful.