Creating shops
In this tutorial, you'll learn about how to create a shop for your project, either creating a full fledged shop with a shopkeeper and a background, something more simple like a vending machine or a small one-item shop.
Complete shop
Let's first start on how to make a complete shop.
The shop file🔗
First, create your shop file, go to scripts/shops and create a new <name>.lua file. <name> is the name of the shop unless you specify an ID.
For this example, I'll create a new file called test_shop.lua. This is the file where you define the logic for the shop. Then add your new class.
---@class TestShop : Shop
local TestShop, super = Class(Shop, "complete_shop")

function TestShop:init()
    super.init(self)
end

return TestShop
For this example, I've defined complete_shop as the ID for the shop, this will be the name that I'll use to reference it later.
If you don't define an ID, you can use the name of the shop file instead, in this case, that would be test_shop.
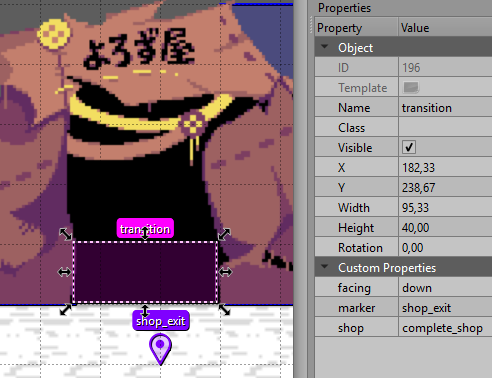
Now... we need a way to get into our new shop, to do that, we can create a Transition Event and set
the shop property to the name of the shop.
In the properties of the Transition, you also define where the player will spawn at when it leaves the shop. I'll explain the properties of a Transition that are useful to make a shop:
shop: string-> The name of the shop to send the player to.x: number-> The x position where the player will spawn when it leaves the shop.y: number-> The y position where the player will spawn when it leaves the shop.marker: string = spawn-> The name of the marker where the player will spawn when it leaves the shop.
It's recommended to use a marker instead of raw x and y values because it's easier to change.
facing: string-> The direction the player will face when it leaves the shop. Can beleft,right,upordown.
With that explained, let's create a transition to our new shop and the exit marker. This is what I've created.
As you can see, I will be using deltarune assets to make this tutorial. Mainly the ones from Seam, I'll not distribute them, but the assets are easily accessible in websites like spriters-resource.com.
With the transition done, this is what our shop currently looks like.
The shop works, so now we need to define everything else.
Shop text🔗
Shop text
Defining the normal text of a shop is very easy, you just need to define the text variables in the init function.
This is the text that a shop has, along with its default value.
self.currency_text = $%d-> The label used for currency in this shop. %d indicates where the money should be in.self.encounter_text = * Encounter text-> The text shown when you first enter the shop.self.shop_text = * Shop text-> The text shown when you return to the main menu of the shop.self.leaving_text = * Leaving text-> The text shown when you leave the shop.self.buy_menu_text = Purchase\ntext-> The text shown when you're in the BUY items menu.self.buy_confirmation_text = Buy it for\n%s ?-> The text shown when you're about to buy something. %s is replaced by the cost of the item.self.buy_refuse_text = Buy\nrefused\ntext-> The text shown when you refuse to buy something.self.buy_text = Buy text-> The text shown when you buy something.self.buy_storage_text = Storage\nbuy text-> The text shown when you buy something and it goes in your storage.self.buy_too_expensive_text = Not\nenough\nmoney.-> The text shown when you don't have enough money to buy something.self.buy_no_space_text = You're\ncarrying\ntoo much.-> The text shown when you don't have enough space to buy something.self.sell_no_price_text = No\nprice\ntext-> The text shown when something doesn't have a sell price.self.sell_menu_text = Sell\nmenu\ntext-> The text shown when you're in the SELL menu.self.sell_nothing_text = Sell\nnothing\nattempt-> The text shown when you try to sell an empty spot.self.sell_confirmation_text = Sell it for\n%s ?-> The text shown when you're about to sell something. %s is replaced by the cost of the item.self.sell_refuse_text = Sell\nrefuse\ntext-> The text shown when you refuse to sell something.self.sell_text = Sell\ntext-> The text shown when you sell something.self.talk_text = Talk\ntext-> The text shown when you enter the talk menu.self.sell_no_storage_text = Empty\ninventory\ntext-> The text shown when you have nothing in a storage.self.sell_everything_text = Sold\neverything\ntext-> The text shown when you have sold all your items in a storage.
A storage is the place where the player stores their items. A shop uses these four storages: items, weapons, armors and storage.
- The
items storageis where the player stores the items that can be used in battle and in the Item tab. - The
weapons storageis where the player stores the weapons. Can be accessed in the Equip tab. - The
armors storageis where the player stores the armors. Can be accessed in the Equip tab. - The
storage storageis the storage that is accessible in savepoints and is where the player saves the items that they don't want in their inventory.
Example
For my example, this is the text for the shop that I came up with.
---@class TestShop : Shop
local TestShop, super = Class(Shop, "complete_shop")

function TestShop:init()
    super.init(self)

    self.encounter_text = "* Welcome back, traveler..."
    self.shop_text = "* What will it be this time?"
    self.leaving_text = "* Come back again...[wait:10] \n* Or not..."
    self.buy_menu_text = "See something you like?"
    self.buy_confirmation_text = "Only for %s"
    self.buy_refuse_text = "Buy something else then"
    self.buy_text = "Thanks \nfor the purchase"
    self.buy_storage_text = "You'll keep it in you storage."
    self.buy_too_expensive_text = "Sorry,[wait:5] but that's not enough."
    self.sell_no_price_text = "I don't buy these"
    self.sell_menu_text = "What junk do you have?"
    self.sell_nothing_text = "You don't have anything there"
    self.sell_refuse_text = "Okay then"
    self.sell_text = "Here is your change"
    self.sell_no_storage_text = "You don't have anything \nto sell"
    self.sell_everything_text = "That should be all"
    self.talk_text = "What do you want to talk about?"
    self.sell_options_text.items = "Let's see what items you have"
    self.sell_options_text.weapons = "What weapons have grown dull?"
    self.sell_options_text.armors = "Any interesting armor?"
    self.sell_options_text.storage = "What have you been storing?"
end

return TestShop
Now that we've added some text, let's see how it looks in game.
Adding items🔗
Adding items
With the text done, now we need to add the items that the shop will sell to the player.
To add a item to the shop, we use the self:registerItem(item, options) function. item is the item ID of the item we want to sell
and options is a table with properties that can be given to that sell item.
The options of a sell item defines these fields:
name-> The name of the item shown in the shop. Usesself.nameof the item by default.description-> The description of the item shown in the shop. Usesself.shopof the item by default.price-> The price of the item in this shop. Usesself.priceof the item by default.bonuses-> The preview stat bonuses provided by the item (does not affect actual item stat bonuses)color-> The color of the item name text. Uses the color white by default.flag-> The name of a flag used to store the remaining stock of this item. Defaults tostock_<index>_<item.id>stock-> The default number of stock of this item. Infinite if unspecified.
Item already defines most of these options, but you can use this options table if you need to overwrite what the item
already defines, or define the options that the Item doesn't define already.
Example
For my example, I'll add Ancient Sweet and CD Bagel as healing items, the Twisted Sword for a weapon and the Shadow Mantle as the armor.
You can't buy most of these in Deltarune, so I'll also define a description for the item, since I'm not going to modify the item data directly, I'll use the options table.
This is the code that adds these items:
function TestShop:init()
...
self:registerItem("ancientsweet", {description = "Only Kris \ncan eat this \nHeals 400HP", stock = 4, color = COLORS.aqua})
self:registerItem("cd_bagel")
self:registerItem("twistedswd", {name = "Twisted Sword", description = "A strange \nblade", price = 6666, stock = 1, color = COLORS.yellow})
self:registerItem("shadowmantle", {price = 666, description = "Shadows slip \noff like water", stock = 1, color = COLORS.black})
end
Let's see how it looks inside of the game.
Shopkeepers🔗
Shopkeeper, background and music
Defining the background and the music for the shop is very easy. First, store the shop music inside of the assets/music folder and the background image for the shop inside
of the assets/sprites/shops folder. Then, define them inside of your shop code.
function TestShop:init()
...
self.background = "shops/<your_background_name>"
self.shop_music = "<your_music_name>"
end
For the example, I've taken Seam shop music from deltarune and stored it in assets/music/shop1.ogg and Seam shop background in
assets/sprites/shops/bg_seam_shop.png and assigned them in my shop code.
function TestShop:init()
...
self.background = "shops/bg_seam_shop"
self.shop_music = "shop1"
end
Creating a shopkeeper is easy, but it requires a few steps.
First, create the assets for the shopkeeper with all the expressions that you want it to have, save them in assets/sprites/shopkeepers/<name>
name is the name of the folder where you'll keep the shopkeeper sprites.
For the example, I've taken the sprites from Seam and placed them in the folder assets/sprites/shopkeepers/seam
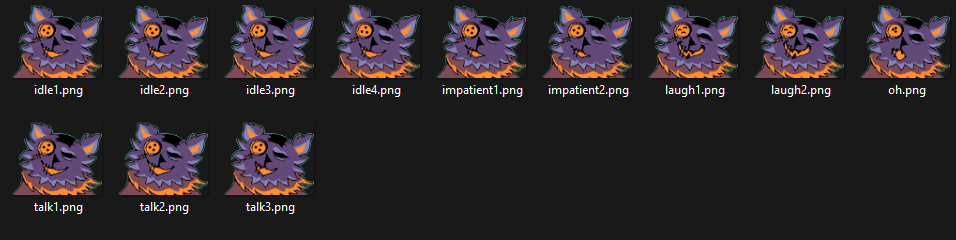
The different names are the animations of the shopkeeper, if you have multiple frames, Kristal will synchronize the animation to the talking of the shopkeeper. In the text, you can change the current animation of the shopkeeper using the [emote:<animation>] tag. More of that in the example.
With the sprites of the shopkeeper done, the second step is to the create the actor of the shopkeeper.
Making this actor is very simple, create a new .lua file in the directory scripts/data/actors/<shopkeeper_name>.lua.
You can use the code for my shopkeeper as a example.
---@class Seam : Actor
local Seam, super = Class(Actor, "seam")

function Seam:init()
    super.init(self)

    -- The name of the actor
    self.name = "seam"

    -- The sprites dimensions
    -- The shop uses this to know where to place the shopkeeper
    self.width = 135
    self.height = 109

    -- The path to the shopkeeper sprites
    self.path = "shopkeepers/seam"
    -- The default animation to use
    self.default = "talk"
end

return Seam
With the actor created, we need to define it in the shop data with this piece of code.
function TestShop:init()
...
-- This makes the shopkeeper slide when you enter the BUY menu
self.shopkeeper.slide = true
-- This places the actor we've just created
self.shopkeeper:setActor("seam")
end
With this done, let's check on how the shop looks.
Making a vending machine
This is a example on how to make a shop that doesn't transition into another place and just uses the shop interface, the vending machines in Chapter 3 are a great example on this, so I'll try to recreate them in this.
First, create the shop.lua file. I'll name mine as vending_machine.lua.
---@class VendingMachine : Shop
local VendingMachine, super = Class(Shop)

function VendingMachine:init()
    super.init(self)
end

return VendingMachine
Then add the shop text and the sell Items.
function VendingMachine:init()
    super.init(self)
    self.encounter_text = "* Buy from the vending machine."
    self.shop_text = "* Buy from the vending machine."
    self.leaving_text = "* You bid farewell to the vending machine."
    self.buy_menu_text = "Buy for money."
    self.buy_confirmation_text = "Only for \n%s"
    self.buy_refuse_text = "Buy for money."
    self.buy_text = "You feel \nbetter."
    self.buy_storage_text = "Saved in your storage."
    self.buy_too_expensive_text = "You don't have enough money.."

    self:registerItem("butjuice", {name = "Juice", description = "Great Healing!\nGreat Price!\nHeals 100HP", stock = 6})
    self:registerItem("tensionbit", {description = "Raises TP by\n32% in battle.", price = 240, stock = 2})
    self:registerItem("revivedust", {description = "Revives all \nfallen party \nmembers to 25% HP.", price = 220, stock = 2})
    self:registerItem("scarlixir", {description = "Has a fruity \ntaste. \nHeals 160 HP.", stock = 4})

end
Since we don't want to hide the world or have the SELL or TALK menu, we need to configure the menu options of the shop.
function VendingMachine:init()
    ...
    -- With this, the map is not hidden
    self.hide_world = false
    -- This is the menu options. First is the text and Second is the State
    self.menu_options = {
        {"Buy",  "BUYMENU" },
        {"Purchase", "BUYMENU" }, -- Replaces the SELL menu
        {"Smile", "SMILE" }, -- Replaces the TALK menu
        {"Exit", "LEAVE" }
    }
    -- This removes the black rectangle behind the UI,
    -- you can leave it if you want
    self.bg_cover:remove()
end
Since we've added a new state to the menu, we need to manage this new state in out code.
We can use the Shop:onStateChange(old, new), overwrite it in your shop code and
add the new state.
function VendingMachine:onStateChange(old, new)
    super.onStateChange(self, old, new)
    if new == "SMILE" then
        self:startDialogue("* You smiled.")
    end
end
Everything that's left, is creating a way of calling this shop. To do that, I'll add the vending machine sprite and
a Interactable and give it a script.
I'll name my script as vending_machine.lua and just add this piece of code.
---The function to execute the shop
---@param event Event The event that executes this script
---@param player Player The player that executes this script
return function(event, player)
    -- This tells the game to load the shop called "vending_machine"
    Game:enterShop("vending_machine")
end
And then make the changes in the map.
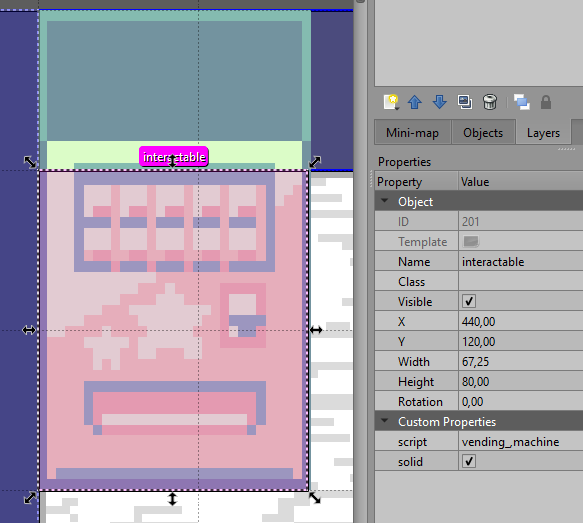
This is how it looks like in the game.
Mini shop UI
There is one more thing I want to talk about in this tutorial, WorldCutscene:showShop() and
WorldCutscene:hideShop(). These can be used inside of a cutscene to show the money and left space that
the player has.
I'll show how to create a cutscene that uses those functions and how to use them in your project.
This is explained better in the cutscenes tutorial. Create a new <name>.lua file inside of scripts/world/cutscenes. name is the
group of the cutscene. Then add a new empty cutscene. I'll name my group as test and the cutscene as shop.
Inside of scripts/world/cutscenes/test.lua.
return {
    ---A testing for the mini shop UI
    ---@param cutscene WorldCutscene
    ---@param event Event
    shop = function (cutscene, event)
    end
}
Now I'll create a cutscene that sells the player one rhapsotea for 250 D$.
return {
    ---A testing for the mini shop UI
    ---@param cutscene WorldCutscene
    ---@param event Event
    shop = function (cutscene, event)
        -- This shows the mini shop UI
        cutscene:showShop()
        cutscene:text("* Do you want to buy a rhapsotea? * One for 250 D$ ")
        -- Ask if the player wants to buy
        local buyOption = cutscene:choicer({"Yes", "No"})

        if buyOption == 1 then
            -- If they choose yes
            -- Game.money is where your money is stored in
            if Game.money >= 250 then
                -- If they have the money, try to give them the rhapsotea item
                if Game.inventory:tryGiveItem("rhapsotea") then
                    -- Play the equip SFX
                    Assets.playSound("equip")
                    -- Subtract the money if the player got the item
                    Game.money = Game.money - 250
                    cutscene:text("* You got a Rhapsotea.")
                else
                    -- If the player inventory and storage is full, don't subtract any money
                    cutscene:text("* You're carrying too much.")
                end
            else
                -- If the player doesn't have enough money
                cutscene:text("* You don't have enough money.")
            end
        end
        -- Hide the mini shop UI
        cutscene:hideShop()
    end
}
With the cutscene done, I'll add some props to the scene and assign the cutscene to a Interactable.
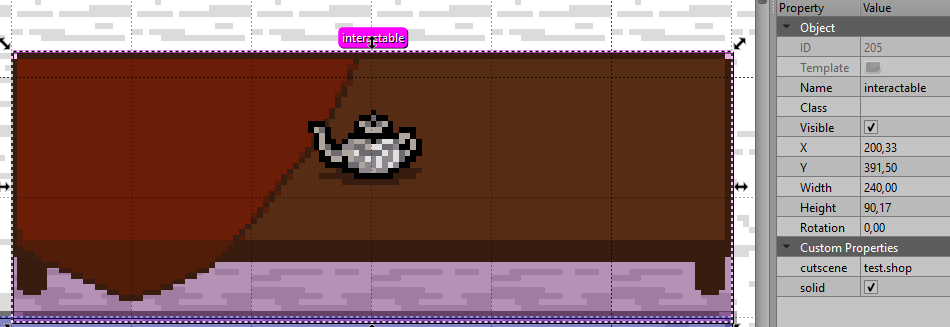
Let's see how it looks inside of the game.