Enemy Attacks
In battle, our enemies need to have attacks that they can use against the player. Without them, we wouldn't have much of a battle at all!
In Kristal, we call these attacks Waves. Lets learn how to make some!
The Basics of Waves
Each attack that an enemy can use in battle is a Wave.
Every turn, each enemy selects one of it's waves at random to use. This also means that when multiple enemies are in battle, we can have multiple waves happening at the same time.
Whenever we want to create a new wave, we add a file to the scripts/battle/waves folder of our project.
We'll dive in right now and create a new file called example_wave.lua. Open the file and paste this boilerplate code inside:
local ExampleWave, super = Class(Wave)

function ExampleWave:init()
    super.init(self)

    -- The duration of our wave, in seconds. (Defaults to `5`)
    self.time = 5
end

function ExampleWave:onStart()
    -- code here gets called at the start of the wave
end

function ExampleWave:update()
    -- code here gets called every frame

    super.update(self)
end

return ExampleWave
Our boilerplate doesn't do much, but it does highlight the functions we're most likely to modify when creating our wave:
Wave:init()- Here, we initialise some basic variables, such asself.time. The wave is not fully ready here, so some functions aren't available.Wave:onStart()- The code inside here runs once at the start of the wave, and this is where our wave logic will go most of the time due to many things being unavailable inWave:init().Wave:update()- The code inside here runs every frame while the wave is active, we can also use this function for wave logic if we need to.
This new wave is created under the wave id example_wave - the same name we gave to the file. We'll need it later to actually use our wave.
Spawning a Bullet
Right now, we've technically created a new wave, but it has no code. That means our wave does nothing at all!
Let's change that by adding a Bullet. The best place to do this is inside our onStart() function:
function ExampleWave:onStart()
    -- code here gets called at the start of the wave

    -- create a bullet in the center of the screen
    local x = SCREEN_WIDTH / 2
    local y = SCREEN_HEIGHT / 2
    local bullet = self:spawnBullet("bullets/example_bullet", x, y)
    -- set the bullet's speed to 4 (pixels per 1/30th second)
    bullet.physics.speed = 4
end
Now we're talking! Let's break down what we just did, and then we can view it in action.
Let's refer back to the code we put inside onStart():
local bullet = self:spawnBullet("bullets/example_bullet", x, y)
This function from the Wave class creates our bullet for us - But how does it work?
We can find out by consulting the documentation! That is found either through the API page for Wave or automatically fetched in-editor if you have the Kristal extension.
For the sake of this guide, the documentation is also included below:
--- Spawns a new bullet to this wave and parents it to Game.battle.
---@param bullet    string|Bullet   As a string, this parameter is either a sprite path, which will create a basic bullet with that sprite, or the id of a custom bullet. As a Bullet, it will directly spawn that instance to the wave.
---@param ...       any             Additional arguments to be passed to the created bullet's init() function. Basic bullets take an x and y coordinate here.
---@return Bullet bullet            The newly added bullet instance.
function Wave:spawnBullet(bullet, ...)
Let's focus first on the first parameter, bullet - it says that it can be either a sprite path, or a custom bullet's id.
In our case, we've put bullets/example_bullet - as we haven't created any custom bullets of our own, this must be a sprite path.
Except... we don't have a sprite for our example bullet yet. Let's solve that by creating one!
Save this image into assets/sprites/bullets as example_bullet.png. This will serve as our sprite! It's path should match what we put earlier - bullets/example_bullet.
This all means that we created a "basic bullet" - that just means it's a standard Bullet object.
The Bullet object handles everything we need out of a bullet for us, such as collision and damage.
We're able to customise these things ourselves too, but that's a topic for later.
As for the x and y values, we can see from the description of the ... that these are for the basic bullet - they're the bullet's spawn co-ordinates.
We're using the values SCREEN_WIDTH / 2 and SCREEN_HEIGHT / 2, which are the center of the game window.
Finally, we can see that this function also returns the Bullet it creates to us:
local bullet = self:spawnBullet("bullets/example_bullet", x, y)
-- set the bullet's speed to 4 (pixels per 1/30th second)
bullet.physics.speed = 4
We put local bullet = before the function to store a reference to the bullet - in this case under the local variable bullet. We can then use that reference to make the bullet do things!
In this case, we've used it to make the bullet move by changing the it's physics.speed value, making the bullet move at whatever angle it is facing, set by physics.direction:
Since we didn't set a direction, it defaults to 0, which causes it to move to the right.
Now let's try running this in our wave! We can do this quickly through Kristal's Debug Menu.
First we need to start an encounter - you may be familiar with how to do that already, but here's another quick way to do it while testing.
Use the Shift+` keys together after loading your project. This should open the Debug Menu.
Scroll down until you see Start Encounter, select that option, and then select the encounter you want from the next list.
I'll be using the default dummy encounter that comes with the project template as we go through this guide. I recommend you use this too as it'll be easier to follow some of the later steps with it.
The encounter should start right away. Now, open the Debug Menu once again.
Towards the bottom of the menu, you should now see the Start Wave option. Select that, then select example_wave in the list that appears.
Oh... that was underwhelming...
But, we do have a bullet! And now we know how to spawn them too, we can start experimenting with our wave.
We can try changing the bullet's physics.direction now - it takes an angle value in radians, let's try making the bullet move left instead.
We could set bullet.physics.direction to math.pi, or we could use the math.rad() function to convert an angle from degrees to radians.
We do that by adding this line at the end of our onStart() function:
bullet.physics.direction = math.rad(180)
If you're not familiar with radians, then working with degrees and using the math.rad() function to convert them to radians is the best way to handle angles.
If you need to change a value that is in radians back to degrees, such as physics.direction, you can use math.deg().
Anyway, let's see what the bullet looks like travelling left!
Huh? It's facing the wrong way!
This happens because the direction the bullet is travelling is, by default, seperate to it's rotation.
When we want our bullet to face the direction it is travelling in, we can instead set bullet.rotation, and then set bullet.physics.match_rotation to true.
This will automatically make our bullet's rotation and direction the same value at all times. However, this does come with a catch.
Earlier we noted that the default direction for all bullets is 0, which is right.
While rotation is technically arbitrary, if we want a bullet to face the direction it's travelling in through this method, we have to design it's sprite so that it faces right by default.
This makes it so that 0 rotation and 0 direction are both aligned with each other.
If you want to match the rotation and direction of a bullet with a non-right facing sprite, you will instead have to set both manually so that you can offset the rotation.
To correctly offset the rotation, you would need to subtract the clockwise angle between the right direction and the direction the bullet is actually facing.
But anyway - we don't need to worry about that for this example, let's swap the line bullet.physics.direction = math.rad(180) out for this:
bullet.rotation = math.rad(180)
bullet.physics.match_rotation = true
And let's try our wave out once more!
Much better!
So, in summary:
- We use the
Wave:spawnBullet(sprite, x, y)function to spawn a basic bullet with our chosen sprite at a specific location. - We store the new bullet, returned by
spawnBullet(), in a local variable. - We can then modify the
physicstable of the bullet with our local variable to control it's movement.
Spawning Bullets (Continued)
Now that we know how to spawn in basic bullets, it's time to put our knowledge to good use in making our wave more like an actual attack.
For starters, let's make our bullet spawn from the dummy itself rather than the center of the screen.
We can get the dummy's EnemyBattler using our wave's getAttackers() function. Let's do this by adding the following line at the start of onStart():
local dummy = self:getAttackers()[1]
Note that we put [1] after the function - that's because getAttackers() returns a table, as we might have multiple enemies using the wave.
Right now, we're focusing on just our one dummy, so we just want to grab the first element of the table. We'll look at how to adapt this for multiple enemies later.
Anyway, let's continue, we want to set the bullet's spawn position to the dummy's center - let's get rid of our original definitions for x and y first.
The getRelativePos() function helps us find the dummy's center - it finds the position of the dummy relative to another point.
By passing in half of the dummy's width and height as the other point, we change this into finding the position of the center of the dummy relative to (0, 0).
local x, y = dummy:getRelativePos(dummy.width/2, dummy.height/2)
But still, at the moment all we have is one bullet firing directly to the left. Let's add more.
We could just add a lot more spawnBullet()s to our code, but that can quickly get out of control and become difficult to manage.
A more sensible approach would be to loop over the code we already have.
Using a for loop, we can make our bullet spawning code from earlier run multiple times. Six bullets seems like a nice number, so we'll go for that:
-- Loop this code six times, with `i` increasing by 1 each time (we don't use `i` for anything here)
for i = 1, 6 do
    local bullet = self:spawnBullet("bullets/example_bullet", x, y)
    bullet.physics.speed = 4
    bullet.rotation = math.rad(180)
    bullet.physics.match_rotation = true
end
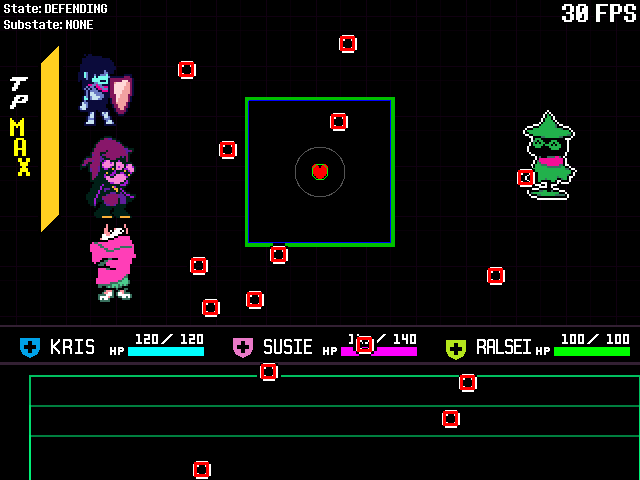
And finally, we're going to change the firing direction of our bullets to aim towards the player:
local target_angle = MathUtils.angle(x, y, Game.battle.soul.x, Game.battle.soul.y)
bullet.rotation = target_angle + math.rad(MathUtils.random(-20, 20))
"Woah! What's happening here?"
Right. Unlike our other changes, there are a few layers to what we did here:
First, we made a new target_angle variable, which stores the angle from our dummy's position (x, y), to the player soul's position, which is (Game.battle.soul.x, Game.battle.soul.y).
The MathUtils.angle(x1, y1, x2, y2) function finds the angle between the two points for us. (As always, this angle is in radians)
We don't want to make all our bullets follow the exact same path though, so we add some randomness when setting our rotation (which would be physics.direction if we weren't using physics.match_rotation):
bullet.rotation = target_angle + math.rad(MathUtils.random(-20, 20))
The MathUtils.random(lower, upper) function generates a random decimal number between the two we input, in this case -20 and 20.
This gives our bullets a 40 degree spread from the target angle.
Now we've made a few changes to our wave, it's time to test it out again!
That's more like it!
At this point, our wave file should be looking like this:
local ExampleWave, super = Class(Wave)

function ExampleWave:init()
    super.init(self)

    -- The duration of our wave, in seconds. (Defaults to `5`)
    self.time = 5
end

function ExampleWave:onStart()
    -- code here gets called at the start of the wave
    local dummy = self:getAttackers()[1]

    -- create a bullet at the center of the dummy
    local x, y = dummy:getRelativePos(dummy.width/2, dummy.height/2)
    for i = 1, 6 do
        local bullet = self:spawnBullet("bullets/example_bullet", x, y)
        bullet.physics.speed = 4
        local target_angle = MathUtils.angle(x, y, Game.battle.soul.x, Game.battle.soul.y)
        bullet.rotation = target_angle + math.rad(MathUtils.random(-20, 20))
        bullet.physics.match_rotation = true
    end
end

function ExampleWave:update()
    -- code here gets called every frame

    super.update(self)
end

return ExampleWave
If you've run into any issues, check them against the above file to see where things are going wrong!
Timers
We're getting somewhere with our new wave, but at the moment we've only been able to spawn bullets at the very start.
In Kristal, we have objects called Timers that can help us change that.
The Timer object allows us to schedule when specific blocks of code (functions) are executed.
Kristal uses the hump.timer library for these timers - if you're interested, you can read it's documentation here. (This is not required to understand how to use timers for this tutorial)
There are a variety of timer functions we can use to schedule our functions in different ways!
Here's some examples of the available Timer functions:
Timer:every(delay, func, count)- Runs our code inside the functionfunceverydelayseconds. If we specify acount, then this will stop after runningcounttimes.Timer:during(delay, func, after)- Runs our code inside the functionfuncevery frame, fordelayseconds. Afterwards, runs the functionafteronce.Timer:after(delay, func)- Runs our code inside the functionfuncafterdelayseconds have passed.Timer:script(func)- Runs the functionfuncas a coroutine that receives await(delay)function as an argument. Thewait(delay)function can be called to suspend the execution of the function fordelayseconds.
We won't be able to explore all timer functions and their usecases in this guide because there are too many to go over at once.
If you are curious about any of the Timer functions not covered by this guide, check the Timer documentation to see what's available, and how they work.
Using the Timer
So, how do we use these Timers in our wave?
Every Wave automatically prepares a Timer for us, stored in the timer variable, which means we'll access it as self.timer from inside our wave code.
We can then call functions on the timer like the ones we mentioned earlier to start scheduling our wave!
For example, to run some code once every second, we'd use Timer:every(delay, func). All the code we want to run goes inside another function inside the timer, like so:
self.timer:every(1, function()
    -- Code goes here
end)
If we put this timer into our wave, it'd run every single second! However we have no code inside it right now, so nothing happens... :(
Let's return to our example wave and look at how we can implement the every function into it.
Right now, all our important code is in the onStart() function, and that function should look like this:
function ExampleWave:onStart()
    -- code here gets called at the start of the wave
    local dummy = self:getAttackers()[1]

    -- create a bullet at the center of the dummy
    local x, y = dummy:getRelativePos(dummy.width/2, dummy.height/2)
    for i = 1, 6 do
        local bullet = self:spawnBullet("bullets/example_bullet", x, y)
        bullet.physics.speed = 4
        local target_angle = MathUtils.angle(x, y, Game.battle.soul.x, Game.battle.soul.y)
        bullet.rotation = target_angle + math.rad(MathUtils.random(-20, 20))
        bullet.physics.match_rotation = true
    end
end
The every() function would benefit us here by letting us repeat the spread of bullets we made earlier!
To use the every() function, we want to add it into onStart() with a delay interval - we'll stick with 1 second, and then move all the code to repeat inside the function.
For us, that's pretty much the whole wave - the only thing we won't put inside is the getAttackers() function:
function ExampleWave:onStart()
    -- code here gets called at the start of the wave
    local dummy = self:getAttackers()[1]

    -- Tell the timer to schedule this function to run every time a second passes.
    self.timer:every(1, function()
        -- create a bullet at the center of the dummy
        local x, y = dummy:getRelativePos(dummy.width/2, dummy.height/2)
        for i = 1, 6 do
            local bullet = self:spawnBullet("bullets/example_bullet", x, y)
            bullet.physics.speed = 4
            local target_angle = MathUtils.angle(x, y, Game.battle.soul.x, Game.battle.soul.y)
            bullet.rotation = target_angle + math.rad(MathUtils.random(-20, 20))
            bullet.physics.match_rotation = true
        end
    end)
end
Let's see it in action!
You might notice the delay that now happens at the start of the wave, because every() has to wait out the delay once before our function is called at all.
We can get to the action faster by making this run once instantly as well - this is done by swapping every for everyInstant.
Timer:everyInstant() is another timer function that is identical to every in every way other than running our function once right away.
If you try the wave again using everyInstant(), you'll see the first wave of bullets spawning instantly.
The Timer:after() function
Let's look at another type of Timer function - this one's the after function:
self.timer:after(3, function()
    -- Code goes here
end)
This function will make our code run after a set amount of time passes. Let's use it to spawn one larger, faster moving bullet later in the wave.
We'll use the setup below to do this - the timer should fit nicely into onStart() below our current everyInstant timer:
-- After three seconds have passed...
self.timer:after(3, function()
    -- Play a sound when our bullet fires
    Assets.playSound("grab")

    local x, y = dummy:getRelativePos(dummy.width/2, dummy.height/2)

    local bullet = self:spawnBullet("bullets/example_bullet", x, y)
    -- Make this bullet double the size of a regular bullet (Default scaling is 2x)
    bullet:setScale(4)
    bullet.physics.speed = 16
    bullet.rotation = MathUtils.angle(x, y, Game.battle.soul.x, Game.battle.soul.y)
    bullet.physics.match_rotation = true
end)
This code should be familiar - it's mostly the same as the way we spawned bullets before.
We have also used Assets.playSound() to play a sound - grab is included with Kristal. (You can find all available sounds in "Sound Test" from the Debug Menu)
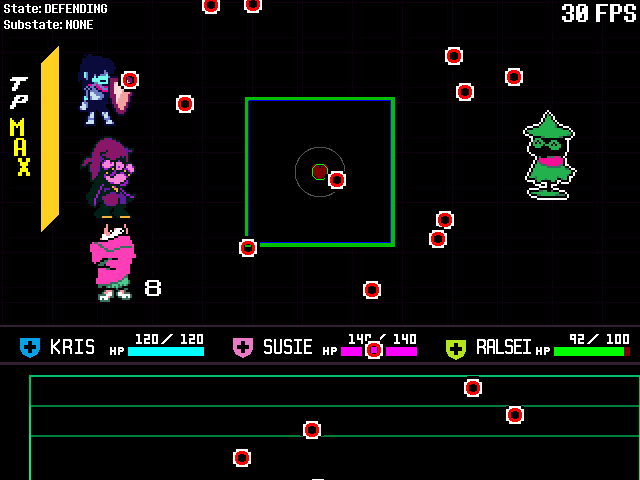
We can also use the after timer to help create a little warning about our big bullet:
-- Alert lasts 24 frames (at 30FPS), so we start it 24 frames before the bullet spawns
self.timer:after(3 - 24/30, function()
    dummy:alert()
end)
Here we use EnemyBattler:alert() to do an alerted (! bubble) effect on our dummy as our attack warning.
Now, let's see our wave in action once again!
In your own waves, you'll probably want more unique and informative warnings than this basic alert, but you'll still want a timer like this to help you!
Timers within Timers
As well as using one timer, we're able to combine timers together by nesting some inside others!
To show this off, lets add an after image effect to our big bullet!
The afterimage effect itself can be made using an every timer.
We can create copies of AfterImage inside the function and it'll give us our desired effect.
But the placement of our timer is important too - we only want our afterimage timer running whilst the big bullet is alive, and we also need to reference the big bullet when spawning afterimages.
That means we need to place this timer inside our previous after timer.
But before we do that, let's establish the code for the new timer - as well as what we've already discussed, there's an additional part we need to include:
-- Every 1/15th of a second...
self.timer:every(1/15, function()
    -- Cancel timer if the bullet is removed
    if bullet:isRemoved() then
        return false
    end

    -- Spawn a new afterimage with 0.4 starting alpha
    local after_image = AfterImage(bullet.sprite, 0.4)
    bullet:addChild(after_image)
end)
The first part of this timer is new - this checks that bullet (which will be our big bullet) has not been removed.
If the condition succeeds (the bullet has been removed), the timer function will return false - this cancels the timer function fully.
But why?
As we said before, we need this timer inside our after function partly to reference the big bullet - cancelling the timer accounts for the other end of the timeline, when the bullet no longer exists.
This happens because all bullets are automatically removed once they go offscreen, UNLESS their remove_offscreen field is set to false.
Now, back to actually nesting our timers!
Return to the after function you set up earlier, and insert the timer into the function after the last line (bullet.physics.match_rotation = true).
If you've got the timer in the right spot, the afterimages should be working! Let's see how they should look ingame:
We could start looking at how we could nest other connected timers too - take the two seperate timers we use for alerting about the big bullet and firing.
But we shouldn't nest our timers for that purpose, as there is another timer function that can do this much more cleanly on it's own!
The Timer:script() function
This one's quite a bit different!
self.timer:script(function(wait)
    -- Code goes here
end)
You'll immediately notice that there is no type of delay when we use Timer:script() - the function runs immediately.
So - where's the time in our timer this time?
The wait argument has our answer.
To put it simply, scripts run functions as "coroutines" - if you've already made cutscenes in Kristal, their scripts also do the same.
A coroutine allows us to pause the function inside itself - to do that, we use the new wait argument in our function.
wait is a function we can call, and pass in any delay to make it wait that long before continuing the function.
It takes times in seconds, just like all of our other timers:
wait(5/2) -- Wait two and a half seconds
Scripts are valuable when we have a sequence of events happening in our wave.
The two seperate after functions we wrote earlier for the big bullet could easily make use of a single script instead:
self.timer:script(function(wait)
    wait(3 - 24/30)
    dummy:alert()

    wait(24/30)
    -- Play a sound when our bullet fires
    Assets.playSound("grab")

    local x, y = dummy:getRelativePos(dummy.width/2, dummy.height/2)

    local bullet = self:spawnBullet("bullets/example_bullet", x, y)
    -- Make this bullet double the size of a regular bullet
    bullet:setScale(4)
    bullet.physics.speed = 16
    bullet.rotation = MathUtils.angle(x, y, Game.battle.soul.x, Game.battle.soul.y)
    bullet.physics.match_rotation = true-- Every 1/15th of a second...

    self.timer:every(1/15, function()
        -- Cancel timer if the bullet is removed
        if not bullet then
            return false
        end

        -- Spawn a new afterimage with 0.4 starting alpha
        local after_image = AfterImage(bullet.sprite, 0.4)
        bullet:addChild(after_image)
    end)
end)
This is functionally identical to how our code worked before, but now all in one function.
Another consideration with scripts is that they allow us to pause the function in "unusual" places, for example in loops.
We won't use this effect in our wave, but it might be helpful to know when using scripts in waves of your own:
self.timer:script(function(wait)
    wait(1)
    for i = 1, 3 do
        self:spawnBullet("bullets/example_bullet", 240 + 80*(i-1), 280)

        wait(6/30)
    end
end)
The following timer script would spawn three bullets below the arena starting one second into the wave, with a 1/5 seconds between each bullet spawning.
You could drop it into the example wave temporarily to see how it works.
That's all for timers in this wave! What we've covered here are the most essential timers, but there are many others you can check out in future over at the Timer API Reference
Now, let's jump into our next topic.
Adding Waves to Enemies
So far, we've been testing our wave in battle entirely through the Debug menu - it's been great while testing, but now we need to make enemies use it naturally.
To do this, it's time to pay a visit to our enemy's EnemyBattler file - for the dummy that's in scripts/battle/enemies/dummy.lua.
Actually, what we have to do is simple this time. Look for the self.waves table in this file, it should look something like this:
self.waves = {
    "basic",
    "aiming",
    "movingarena"
}
These are all wave ids - we'll need to add our wave's id to this list to make it get selected too.
As we covered earlier, that id is the filename of the wave, example_wave.
But, to speed up seeing this working, we'll remove all the other waves from the dummy making it guaranteed to select our new wave:
self.waves = {
    "example_wave",
}
And that's all we need to do! There are of course situations where we need more granular control over this process, like boss battles, but those are a topic for later.
(You can learn about that in the Wavemaking Tricks article.)
Waves with Multiple Attackers
We're finished adding new things to this wave, but we're not through with the wave itself yet.
That's because we should to touch on how to handle mulitple attackers, something we noted briefly earlier.
To start this off, we need a second enemy. Let's quickly hop over to the encounter file. That's scripts/battle/encounters/dummy.lua unless you've been using one of your own.
All we need to do is copy the line where we add our first enemy.
In the dummy encounter file it's even easier as it's already been written our for us in a comment. All we need to do is uncomment it:
-- Add the dummy enemy to the encounter
self:addEnemy("dummy")

--- Uncomment this line to add another!
self:addEnemy("dummy")
Now, lets start a wave with multiple copies of our enemy present. Make sure they both can only select example_wave for now.
As expected, only one dummy is firing any projectiles - that's in part because we did this earlier when we wanted to work with our dummy:
local dummy = self:getAttackers()[1]
What we did here wasn't necessarily incorrect - it's perfectly valid to get the enemy like this when we only have one attacker using it.
But, like in our situation now, if multiple enemies might use our wave at the same time, we have to write our wave to account for that.
Fortunately for us, adapting waves to work with multiple enemies isn't much hassle. It also won't change how one dummy uses the wave on it's own.
The general solution for this is to run this once for each enemy we have.
We use an iterator to do this. It's a type of loop we write like so:
for _, dummy in ipairs(self:getAttackers()) do
    -- The code we want to run goes in here
end
This will run through the code one time for each attacker we have present.
Each time it runs, dummy changes to the next attacker in the table.
The other variable, _, is also changing - it represents the index of the current dummy in the list, so it starts at 1, then goes to 2, etc.
This variable normally gets written as i, but we've written it as _ because we don't need to use it anywhere, freeing up i for something else.
Now let's talk implementation. The simplest solution and the one that works for our wave is looping the whole thing.
That just means wrapping all the code inside of onStart() into this loop, and removing the line where we first defined dummy before.
Once you've done that, try running the wave again.
If all has gone according to plan, it should look like this:
Look at that - our second dummy is also using the attack!
If you're seeing something different, then you probably implemented the iterator incorrectly.
Since we're at the end of the wave, you can check the complete wave code just below here against your own to see how the iterator should be implemented if you ran into any issues.
Keep in mind that this does run the entire function for every attacker.
If you want unique multi-attacker behaviour for a wave, or there are some things you don't want repeating, you can experiment with multiple iterators over smaller parts of code instead.
Ultimately it's just another part of the experimentation process of waves, if you want something specific, fiddle around with your code until you get it acting how you want it to. You might not need to use iterators at all!
A Complete Wave!
That's right! We're finished with this first wave!
The final code for this example is as follows:
local ExampleWave, super = Class(Wave)

function ExampleWave:init()
    super.init(self)

    -- The duration of our wave, in seconds. (Defaults to `5`)
    self.time = 5
end

function ExampleWave:onStart()
    for _, dummy in ipairs(self:getAttackers()) do
        self.timer:everyInstant(1, function()
            -- create a bullet at the center of the dummy
            local x, y = dummy:getRelativePos(dummy.width/2, dummy.height/2)
            for i = 1, 6 do
                local bullet = self:spawnBullet("bullets/example_bullet", x, y)
                bullet.physics.speed = 4
                local target_angle = MathUtils.angle(x, y, Game.battle.soul.x, Game.battle.soul.y)
                bullet.rotation = target_angle + math.rad(MathUtils.random(-20, 20))
                bullet.physics.match_rotation = true
            end
        end)

        self.timer:script(function(wait)
            wait(3 - 24/30)
            dummy:alert()

            wait(24/30)
            -- Play a sound when our bullet fires
            Assets.playSound("grab")

            local x, y = dummy:getRelativePos(dummy.width/2, dummy.height/2)

            local bullet = self:spawnBullet("bullets/example_bullet", x, y)
            -- Make this bullet double the size of a regular bullet
            bullet:setScale(4)
            bullet.physics.speed = 16
            bullet.rotation = MathUtils.angle(x, y, Game.battle.soul.x, Game.battle.soul.y)
            bullet.physics.match_rotation = true-- Every 1/15th of a second...

            self.timer:every(1/15, function()
                -- Cancel timer if the bullet is removed
                if not bullet then
                    return false
                end

                -- Spawn a new afterimage with 0.4 starting alpha
                local after_image = AfterImage(bullet.sprite, 0.4)
                bullet:addChild(after_image)
            end)
        end)
    end
end

function ExampleWave:update()
    -- code here gets called every frame

    super.update(self)
end

return ExampleWave
There's much more to learn about waves, but before we move on, i'd say a quick recap of what we've learnt so far is in order.
- Most importantly, we learned what waves are, and that we put them into
scripts/battle/waves. - We also learned how to spawn bullets, or the Basic Bullet at least, and how the
physicstable lets us easily make those bullets move. - We looked at how to grab the enemies associated with our attack through the
Wave:getAttackers()function, and use them in our wave. - We worked out how to make waves usable by enemies, by modifying their
wavestable. - And of course, we learned about the importance of Timers in wave creation, and covered some uses of the
every,after, andscriptfunctions.
We'll look at Custom Bullets, the Arena, Collision, and expand on wave selection with the next example.
Before that, though - experimentation is at the heart of waves, so feel free to take some time now that we're finished with this example here to mess around with it however you please!
Whenever you're ready, continue on to the next part of this guide.
Wave Making 2: Electric Boogaloo
Earlier, we mentioned Custom Bullets when using the spawnBullet() function. It's about time we learnt what those are and how we use them.
We'll be starting with a fresh wave from here out, so let's get the housekeeping out of the way.
Create a new wave file like before, and call this one example_wave_2.lua. Then insert the boilerplate code again:
local ExampleWave2, super = Class(Wave)

function ExampleWave2:init()
    super.init(self)

    -- The duration of our wave, in seconds. (Defaults to `5`)
    self.time = 5
end

function ExampleWave2:onStart()
    -- code here gets called at the start of the wave
end

function ExampleWave2:update()
    -- code here gets called every frame
    super.update(self)
end

return ExampleWave2
Also, we can set this wave up to be chosen by the dummy now to get it out of the way - jump to enemies/dummy.lua and edit the wave table once again:
self.waves = {
    "example_wave_2",
}
This time, using the dummy specifically for our testing is going to be a bit more important - so make sure you're testing this wave through the dummy! (We'll get to why later)
That's all we need to do setup wise! Let's move on and start looking at Custom Bullets!
Custom Bullets
So far we've only studied the standard Bullet object in our waves.
Kristal makes it very easy to make our own custom types of Bullet too.
For the most part, the difference is that we define custom bullets as their own files, and can control them from that file.
That doesn't prevent us from modifying them in the wave either, although it usually isn't necessary with custom bullets.
If you're having to repeat a lot of code, or you want to use the same bullet across multiple waves, custom bullets will help you do that.
There's also one much more significant reason to use custom bullets that sets them apart on more than just an organisation level.
When we make a custom bullet, it will inherit from the regular Bullet class. This allows us to modify the default behaviour of the bullet.
This opens up some new possibilities for what we can do with bullets.
Let's not delay any more and look at how to make one.
Making a Custom Bullet
As you might have guessed, the files for custom bullets should be placed in scripts/battle/bullets.
The bullet name/id will match the filename, just like when we made our wave files. That id is what we'll later use with spawnBullet().
So let's add a file! This one will be called example_wiggly_bullet.lua. We'll be starting out with the following code:
local ExampleWigglyBullet, super = Class(Bullet)

function ExampleWigglyBullet:init(x, y)
    super.init(self, x, y, "bullets/donut")

    -- Bullets will be spawning offscreen later, so we have to turn this off
    self.remove_offscreen = false
    -- Bullets default to 2x scale, we want ours a bit bigger this time
    self:setScale(3)
end

function ExampleWigglyBullet:update()
    super.update(self)
end

return ExampleWigglyBullet
On the top line of this file, we make our new bullet inherit from the original Bullet class.
For custom bullets, it'a slso important to draw attention to the parameters of init, and super.init.
super.init generally wants you to feed in the spawn co-ordinates, as well as a sprite.
However, what we put as the parameters of our init function, ExampleWigglyBullet:init() do not need to be the same.
We can put whatever we want as parameters to our init(), and the ... in spawnBullet() allows any number of additional arguments to be inputted - all of them go right through to Bullet:init()!
We'll go more in depth on this later, for now all we need to know is that we're still going to use x and y.
As for our bullet texture, I've set that in super.init as bullets/donut. Naturally, we need to have a sprite there to go with it:
This one should be saved into assets/sprites/bullets/donut.png.
Bullet Behaviour
Now, onto our goals for the behaviour of this bullet!
We're going to make the bullets for this wave move upwards from the bottom of the screen while wiggling in a random wave motion.
(If this doesn't make sense, you'll see how it actually looks soon so don't panic!)
Later we'll then look at adding an additional variation to our wave in the form of green bullets, that only appear under specific conditions.
Let's start with the easy part - the movement on the y-axis, which we can do with physics.
We've used the physics table once before already. This time all we need from it is our bullets moving directly upwards. We can set speed_y in init() for this:
self.physics.speed_y = - love.math.random(5, 10)
This makes the y-speed of each bullet range between -5 and -10. If we wanted bullets to go downwards instead we'd remove the -.
For the wiggling effect, things will be a little more complicated. We're going to make use of mulitple functions here to help create this motion.
Our first step will be to define a new variable, self.orig_x in bullet:init().
This variable will remember the original x value the bullet was spawned at, it will be useful for making the bullet wiggle later.
We also want to define some additional variables related to sine waves:
-- The origin of the bullet's wave motion (the x-value that the wave is centered on)
self.orig_x = x
-- The magnitude of the wave (How many pixels away from the origin the bullet can move)
self.wave_magnitude = 24
-- Multiplies the speed at which the bullet wiggles
self.wave_speed = love.math.random(5, 8)
-- A random number generated for this bullet to offset its wave position
self.random_offset = love.math.random()
wave_magnitude and wave_speed will change the shape of the wave the bullets move along.
I've set some values up which you can feel free to keep as they are or change about, but wait until we have the wave running, so you can compare numbers to see how they affect the wiggliness of our bullets.
That's all of our variables setup in init(), so now we can move on to update().
Since update() runs every frame, we're going to use it to keep changing the bullet's x-coordinate based on values from different points on a sine wave.
This might sound complicated, but actaully all we need to do is use the Utils.wave(val, min, max) function and all the sine wave calculations are handled for us.
The number we get back from the Utils.wave() function is the value our bullet should be displaced from it's baseline (the orig_x value) this frame.
Let's look at what that looks like in code form. I've commented each line explaining how they work:
-- Kristal.getTime() gives the amount of time that has elapsed (in seconds) since Kristal was opened
-- We add the "random offset" so that every bullet will have a slightly different time value (and therefore a different wiggle)
local time_value = Kristal.getTime() + self.random_offset

-- The actual displacement calculation happens here
-- Using Utils.wave(), we first feed in the "time value" multiplied by the wave speed which determines what point on the sine wave is picked out (we don't need to worry about that much)
-- The next two values are the lower and upper bound of the wiggle - our arguments mean that the bullet can move one magnitude either side of its spawn position.
-- The value the function returns is the x-axis displacement we will use for this frame - a number between `-self.wave_magnitude` and `self.wave_magnitude`.
-- With the value we set on `wave_magnitude` before, that's `-24` and `24`.
local disp_x = Utils.wave(time_value * self.wave_speed, -self.wave_magnitude, self.wave_magnitude)

-- When we get our displacement value, all we need to do is actually move the bullet! This is where we use the origin value.
self.x = self.orig_x + disp_x
For now, this is everything we need to do in our custom bullet!
Before we head back to the wave to get our bullets spawning, let's do a quick check that our code is in the right place.
Your bullet file should be inside of scripts/battle/bullets, named example_wiggly_bullet.lua.
The contents of the bullet file should look similar to this:
local ExampleWigglyBullet, super = Class(Bullet)

function ExampleWigglyBullet:init(x, y)
    super.init(self, x, y, "bullets/donut")

    self.remove_offscreen = false
    self:setScale(3)

    self.physics.speed_y = - love.math.random(5, 10)

    self.orig_x = x
    self.wave_magnitude = 24
    self.wave_speed = love.math.random(5, 8)
    self.random_offset = love.math.random()
end

function ExampleWigglyBullet:update()
    super.update(self)
    local time_value = Kristal.getTime() + self.random_offset

    local disp_x = Utils.wave(time_value * self.wave_speed, -self.wave_magnitude, self.wave_magnitude)

    self.x = self.orig_x + disp_x
end

return ExampleWigglyBullet
If you notice anything off, correct it now, and then we can move on to spawning our bullets!
Spawning a Custom Bullet
The last stage of learning how to use our first custom bullet is getting to see it in action!
As we touched on before, we still make use of Wave:spawnBullet() for this, but this time we'll be using an id rather than a sprite.
For our custom bullet, we're going to start with self:spawnBullet("example_wiggly_bullet", 320, SCREEN_HEIGHT) to spawn a singular bullet at the bottom-center of the screen.
Let's put that line in ExampleWave2:onStart() right now, and run the wave. This will let us see one bullet so we can know we've got it working.
Epic! Our bullet is looking how it's supposed to. Now let's spice it up a bit with a Timer.
All we're going to do is make a lot of bullets spawn:
self.timer:everyInstant(1/8, function ()
    self:spawnBullet("example_wiggly_bullet", love.math.random(120, SCREEN_WIDTH - 120), SCREEN_HEIGHT + 20)
end)
We've used everyInstant before, so there should be no surprises here.
Now we can run the wave again and see what it looks like when we have a lot of bullets at once:
Looking good!
Bullet Collision
Now we have our custom bullet set up and in action, we should talk a bit about how collision works in battle.
Three main things have collision in battles - The player soul, the arena, and bullets.
The arena collision is not relevant to bullets.
The soul and bullet collisions, on the other hand, are relevant.
Enabling Debug Rendering in the Debug Menu allows us to see the collision of all objects onscreen.
Let's start with how the soul looks in Debug Rendering:

As you can see, the circle has two circles drawn around it when we turn on debug rendering.
These are both types of Collider objects - all object collision in Kristal is handled through subclasses of Collider.
The inner green circle is the soul's actual hitbox. It uses a collider called CircleCollider.
The outer gray circle is the grazing hitbox. It also uses CircleCollider.
We don't do anything with these but it's good to know that these are what bullet collision is compared against.
The part that we really care about is bullet collision!
If we run our wave with debug rendering, we'll be able to see how our hitboxes look:
The collision objects used for our bullets here are Hitboxes.
If we don't manually set any collision, then this is the type of collision our bullets default to. Kristal does the following to create these hitboxes:
-- From src/engine/game/battle/bullet.lua

-- Default collider to half this object's size
self.collider = Hitbox(self, self.width/4, self.height/4, self.width/2, self.height/2)
This makes the collision of the bullet a rectangle half the size of the texture the bullet is using.
If the bullet does not have a texture set through Bullet:setSprite() or super.init() then it won't be given any default collision.
Our wigglybullets don't have problematic collision, but it won't hurt to show off setting custom collision on the either.
Let's make them use a CircleCollider - they are donut shaped, after all.
Inside of ExampleWigglyBullet:init(), add the following line:
self.collider = CircleCollider(self, self.width/2, self.height/2, self.width/2 - 2)
This changes our bullet's collision object (Bullet.collider) to a new CircleCollider instance.
The CircleCollider takes four arguments: self, self.width/2, self.height/2, and self.width/2 - 2 for the parameters parent, x, y, and radius.
The first variable being parent should be self-explanatory - it's the bullet's collider, so it should be parented to the bullet (self) all the time.
Meanwhile, the next two, x and y, are the position of the center of the circle, relevant to the origin of the bullet.
self.width/2 and self.height/2 align the circle with the center of the bullet, because our bullets' origins are at their top-left corner.
Finally, we set the radius to self.width/2 - 2, or two pixels less than half the bullet's width.
Using just self.width/2 as the radius would create a collision that goes around the outer edge of the bullet.
I've used - 2 instead to ensure that the circle is smaller than the bullet itself.
This is for the same reason bullet hitboxes are half the object size - collision is better slightly smaller than the object it represents, as it creates a more convincing connection on successful hits.
Anyway, let's take another look at our bullets in Debug Rendering with their new collision!
If you ever find that the default collision isn't working for your bullet, try out some colliders to make something more fitting!
You can also use a ColliderGroup to stick multiple colliders together if you need some really funky collision shapes.
You can find a list of all the available colliders in the Wavemaking Reference.
Using The Arena
A big part of many attack designs in DELTARUNE is their manipulation of the arena.
Kristal's Arena object handles, well, the arena. It can be used to modify the arena in a variety of ways.
The arena used in battle is stored under Game.battle.arena when it exists, and thats the variable we use to modify it.
There are some functions in Wave that can control it too. We mainly want to use those in Wave:init(), as it gets called just before the arena is created.
Let's start out simple and demonstrate some those basic transformations we can set up in Wave:init(). These will all affect the initial state of the arena, including the transition animation.
Using Wave:setArenaSize(width, height) we can change the size of the arena. As a reference, the default arena size is 142x142.
We can set the starting rotation of the arena with Wave:setArenaRotation(angle).
If we want to move the arena, we can either use Wave:setArenaOffset(x, y) or Wave:setArenaPosition(x, y).
The former sets the arena's position as a displacement from it's standard starting position, while the latter sets the position of the arena relative to the top-left of the screen.
Here's an example set of transformations you can try:
-- Put these into Wave:init()

self:setArenaSize(100, 142) -- Make the arena thinner
self:setArenaRotation(math.rad(45)) -- Rotate it at a 45 degree angle
self:setArenaOffset(-60, 40) -- Move it 60 pixels left and 40 pixels down from its normal starting position
These three together will look like this in your wave:
![]()
Try putting in some values of your own!
The other function we can use in Wave:init() is Wave:setArenaShape(...).
This one is more complicated as you'll need to specify your shape as a series of vertices. Here's an example shape below:
self:setArenaShape({0, 0}, {-40, 0}, {100, -80}, {240, 0}, {200, 0}, {200, 84}, {0, 84})
All the tables you see in this are co-ordinate pairs that represent each vertex of the shape.
The co-ordinates are relative to the position the arena is set at.
If you put this function in your wave...
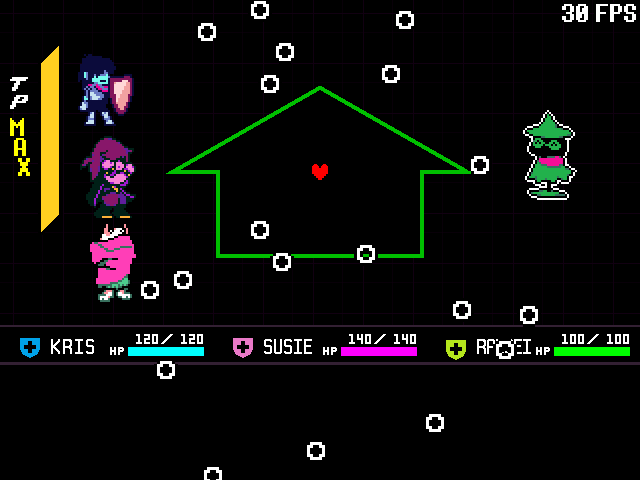
Check it out!
Feel free to play around with these functions however you like for a bit. We're going to remove all of them in a moment anyway.
Dynamic Effects
Sometimes, we'll want the arena to change dynamically throughout our waves.
As we mentioned before, we can access the arena through Game.battle.arena once it has been created at the start of the wave.
So, what do we do with the Arena object once we have it?
Well, actually, it's just another Object! That means we have all the same tools at our disposal as we do with bullets.
Of course, we also have Arena:setSize(width, height), and Arena:setShape(...) for changing the arena size/shape during the wave too
They work the same way as the Wave equivalents we looked at earlier.
Let's demonstrate some dynamic arena movement by making it sway side to side. But first, make sure to remove any transformations from the step above.
We're going to steal the wave effect from our wiggly bullet to make the swaying of the arena here.
It does require a few changes though, so keep an eye out for them!
Inside of Wave:init(), we need to set a few variables - some might look familiar:
self.siner = 0
self.wave_magnitude = 80
self.wave_speed = 2
In Wave:update(), we can then add the code to make the arena sway. The code comments explain the differences between the code here, and the one from our bullet.
local arena = Game.battle.arena
-- The arena doesn't exist in `Wave:init()`, so the next best place for us to get it's original/center x is here. This condition makes sure that the value is set only once.
if not self.orig_x then
    self.orig_x = arena.x
end

-- Instead of Kristal.getTime(), we're making use of this `siner` variable here to keep time.
-- This is because for the arena, having a start value of 0 is important, so that the arena
-- doesn't suddenly snap to another position on the first frame of the wave.
-- The DT global variable we're using here is the time in seconds that has elapsed since the last
-- frame, and makes the siner incremement at the same speed as Kristal.getTime() as well.
self.siner = self.siner + DT

local disp_x = self.orig_x + Utils.wave(self.siner * self.wave_speed, -self.wave_magnitude, self.wave_magnitude)

arena:setPosition(disp_x, arena.y)
To prove it works, let's run our wave to see it in action!
I'll be keeping this one as we go through the rest of the guide - you can feel free to set whatever transformations you want.
Making Green Bullets
Earlier we mentioned adding a green (healing) variation to our wiggly bullet - we're going to do that now with the help of additional bullet arguments.
They'll only appear under the condition that we use a specific ACT on the dummy.
Let's make a start by creating the green bullet effect!
Returning to example_wiggly_bullet.lua, we can first add to init() some new variables and the part where we set a green bullet to be green:
self.green = false
self.heal_amount = 8

if self.green then
    self:setColor(COLORS.lime)
end
For now, green is always set to false, but later we'll be changing that soon.
To do the healing logic of green bullets, we need to look at overriding bullet behaviour.
Overriding Bullet Behaviour
This is a unique feature of custom bullets. We're going to change part of the default bullet behaviour by overriding one of the functions our wiggly bullet inherited.
The function we're targetting here is Bullet:onCollide(soul). It handles what happens when the bullet collides with the soul, including dealing damage and checking iframes.
Overriding a function is as simple as just redefining it in the custom bullet file like this:
function ExampleWigglyBullet:onCollide(soul)
    super.onCollide(self, soul)
end
This override here just calls the original onCollide function inherited from Bullet, which is no different to not defining it at all. Let's go through what we should change to make our healing bullets.
When the bullet is green we'll heal the whole party by heal_amount.
We can access party members through Game.battle.party, and loop through each one, calling heal() to heal them. We can then remove the bullet after we've healed everyone:
for _, party in ipairs(Game.battle.party) do
    party:heal(self.heal_amount)
end
self:remove()
If the bullet isn't green we'll call super.onCollide(soul) to make sure they continue to deal damage like normal.
We can use the green field on our bullet that we made earlier to determine whether it is or isn't green - and run the behaviour for that bullet type accordingly!
function ExampleWigglyBullet:onCollide(soul)
    if self.green then
        for _, party in ipairs(Game.battle.party) do
            party:heal(self.heal_amount)
        end
        self:remove()
    else
        super.onCollide(self, soul)
    end
end
Now, let's implement a way to make the bullets turn green!
To do this, we can make use of additional parameters when we create our custom bullet.
Custom Bullet Arguments
In both of our examples so far, we've spawned bullets using Wave:spawnBullet(bullet, ...). Despite there only being two parameters - bullet and ... - we've passed in three values each time.
What's going on here?
The ... here is called a vararg, which you may or may not be familiar with already - it's a way for a function to receive an indefinite/unknown amount of arguments.
For spawnBullet(), it uses ... as an effective stand-in for the arguments to the constructor of the spawned bullet.
If you're not familiar with the term, the constructor is just what we call the function that runs on every instance of a class when it gets created. You know it already as the init() function.
The wigglybullet's current constructor just takes in it's spawn co-ordinates, x and y. Let's add a new parameter to it called try_green:
function ExampleWigglyBullet:init(x, y, try_green)
We can use our new parameter, try_green, to give the bullets a chance to be green if it's true.
Replace the previous self.green = false line inside ExampleWigglyBullet:init() with this:
self.green = try_green and love.math.random() < 0.3 or false
This gives our bullets a 30% chance to spawn as a green bullet when try_green is true.
Let's now return to our wave and pass in a value for try_green!
Of course, we want our bullets to have a change to be green, so let's pass in true! We add it on as a new argument in spawnBullet:
function ExampleWave2:onStart()
    -- code here gets called at the start of the wave

    self.timer:everyInstant(1/8, function ()
        -- x and y have been moved here so we can see the number of arguments more clearly
        local x = love.math.random(120, SCREEN_WIDTH - 120)
        local y = SCREEN_HEIGHT + 20
        self:spawnBullet("example_wiggly_bullet", x, y, true)
    end)
end
This should make our green bullets start appearing in the wave. Let's check it out!
Of course, if we're just setting try_green to true all the time, there wouldn't be any purpose in having this check at all - So let's give it one!
Let's see about making the green bullets only appear when we use the Smile ACT on the dummy. Start by reopening scripts/enemies/dummy.lua.
We first want to add a new field to the dummy to track whether we've smiled at it this turn. We'll call this one self.smiled_at.
Add the line self.smiled_at = false into Dummy:init().
Now, inside of Dummy:onAct(), we need to find the code that runs when we use Smile.
This is the one we're looking for:
if name == "Smile" then
    -- Give the enemy 100% mercy
    self:addMercy(100)
    -- Change this enemy's dialogue for 1 turn
    self.dialogue_override = "... ^^"
    -- Act text (since it's a list, multiple textboxes)
    return {
        "* You smile.[wait:5]\n* The dummy smiles back.",
        "* It seems the dummy just wanted\nto see you happy."
    }
Insert the line self.smiled_at = true into this code, anywhere before the return statement.
The final thing to do is use the EnemyBattler:onTurnEnd() callback to reset it's smile status every turn.
This works in the same way as our function override from before:
function Dummy:onTurnEnd()
    self.smiled_at = false
end
There's no super call in this one as onTurnEnd doesn't normally run any code of it's own.
Let's head back to the wave and use this new variable to control when the bullets will roll a green check.
We should add this to the beginning of ExampleWave2:onStart():
local attackers = self:getAttackers()

local smiled_at = false
for _, attacker in ipairs(attackers) do
    if attacker.smiled_at then
        smiled_at = true
        break
    end
end
This code checks all attackers for the smiled_at field, and if at least one was smiled at, then we set the local variable of the same name to true.
We also need to pass smiled_at into the spawnBullet function. We can do that by replacing the true argument we previously passed in there:
self:spawnBullet("example_wiggly_bullet", x, y, smiled_at)
After we do this, green bullets should only spawn on turns when we smile at the dummy.
Let's give it a test!
Enemy Wave Overrides
On the topic of making our bullets turn green when we use the Smile ACT, there's a potential issue with our current solution in an actual enemy scenario.
If you tie wave behaviour to a specific ACT, you'll likely want that wave to happen on the turn of the ACT as well.
If an enemy has more than one wave, then our desired wave isn't always being chosen! Luckily, we can fix that.
All enemies (EnemyBattlers) have a wave_override variable, that does just what it says - it overrides the wave chosen this turn.
Let's set up a scenario in our example where the dummy might choose from multiple waves.
We can add to it's waves table, let's bring back all of the default waves and our previous example wave:
self.waves = {
    "example_wave",
    "example_wave_2",
    "basic",
    "movingarena",
    "aiming",
}
Now, let's use wave_override. Find your way back to the Smile ACT code from earlier.
Below the line self.smiled_at = true, add the following:
self.wave_override = "example_wave_2"
That's all there is to it!
And don't worry about having to reset the wave override like the smiled_at variable from before - wave_override is cleared after each turn automatically.
Ending Note
That's everything for this guide! We've gone through lots about waves and all their associated objects.
There's a lot that goes into making waves, including some things that we didn't talk about here!
Translating your attacks from ideas to code is a problem-solving process - you'll need to take what you've learnt and work out which features and functions will help you create what you're looking for.
That's not always the easiest process, but knowing how waves work and the features available to you should make that process easier. Here's to good luck in making your attacks come to life!
Ah, but one more thing before you go!
There's one last thing to mention on the topic of wave creation...
Ahem.
Now that you've surfed through the basics of waves, you're equipped with all the important knowledge to set out creating ones entirely of your own.
But the seas of wavemaking are turbulent, and a great tsunami of information yet approaches on the horizon...
... Okay, okay! I'll stop with the water puns.
Anyway... as an additional resource to these guides, there is also a Wavemaking Tricks and References with quick references to many relevant functions, as well as some additional short guides to doing specific things in a wave.
You should check over it's table of contents to see what it covers.